Showing posts with label Resist Embossing. Show all posts

Sunday, 11 May 2025

Cheers & Sips for Paper Players 737

Hard to believe it but it's already time for a new challenge at The Paper Players. We were delighted by the entries in Joanne's 'Something Old, Something New' challenge. We hope you'll have as much fun with Ann's colour challenge. 


While these colours did sing of flowers to me, it was the Cheers & Sips bundle that ended up getting an outing instead. It's still on my desk as I'm prepping for the Creativity Abounds Virtual Stamp Camp at the end of June. If you're interested in joining me, and the other 12 members of the international crew, for this stamp camp you can read the details here.

The card base is Lost Lagoon, with a jauntily  askew piece of Berry Burst as a matte. The Basic White card front is embossed with one of the Glass & Garden embossing folders.


I used Versamark to stamp an image of each of the glasses and added some ice cubes to each. Then I used WOW White Embossing Powder and heated it up. Then I sponged over Bubble Bath ink and Berry Burst ink with a blending brush


I used the same resist emboss technique to create the umbrella, strawberry and mint leaf. The sentiments were stamped in Lost Lagoon ink. 

Then I added the mocktail glasses to the card front, popping the Bubble Bath long glass up on dimensionals.

To finish off, I added in a trio of Berry Burst tinsel gems - which have sadly just retired but can still be snapped up on the Last Chance list.

You can see what the rest of the design team have done, and link up your entry, at The Paper Players page.

Here's a quick recap of our challenge rules:
  1. Create a new paper-craft project specifically for this challenge.
  2. Upload your creation to your blog with a link back to us.
  3. Please provide a direct link to the post featuring your challenge entry.
  4. Please link your card to no more than four challenges, TOTAL, including ours
  5. Have fun, and thank you for playing with us!
Don't forget to check out the great inspiration from the rest of the design team.

Anne Marie Hile (on leave)
Jan Clothier - You are here


If you live in New Zealand and don't have a Stampin' Up Demonstrator, I'd love to be yours. I can help you with ideas, get you catalogues and provide you with Stampin' Up products. You can leave a message in the comments or contact me using any of the methods listed in the Contact Me tab at the top of the page. 

You can stamp with me, and shop with me, from anywhere in New Zealand. Click here.


Friday, 7 February 2025

Beautiful Butterflies for AYSI 341

 It was so great to see so many entries in our last  As You See It challenge where people posted their crafting resolutions for 2025. I hope you enjoy this next challenge because it's my first challenge of the year. It's a recipe challenge: just take the five given ingredients, add your own bits and bobs, and see what you can cook up!


When I sat down to create this card, I did begin to wonder what planet I'd been on when I thought up a mixture of a celebration theme, heat embossing, ribbon or twine, punch or die and pastel colours!

A deep breath and a look over at the Beautiful Butterflies bundle sitting on my desk lead me to this....


The sentiment, which ticked off the 'celebration' part of the recipe, is from the Beautiful Butterflies stamp set - which this month is one of the free items you can choose as a Sale-a-Bration reward with a qualifying purchase. 


To get the heat embossing part of the recipe in, I white heat embossed the sentiment onto a strip of Beautiful Bokeh DSP. Pleasingly, it was an off-cut from another project so was technically a scrap!

I also used Resist Embossing to create the large butterfly. I heat embossed the image in white onto Basic White card, then sponged over Lemon Lolly, Balmy Blue and Fresh Freesia inks with blending brushes to colour the unembossed spaces.  These colour choices ticked off the 'pastel colours' part of the recipe. They are all members of Stampin' Up!'s subtle colour family.

The large butterfly was die cut out, and I also die cut a small butterfly, and these ticked off the 'use a die' part of the recipe. I sponged the small butterfly with some Lemon Lolly ink and layered it over the large one. 

The final element was to use ribbon or twine. I added in a small silver bow using the regrettably retired silver twine from the Elegant Trim pack. If you're like me, you'll have a sizeable stash of it tucked away!

In case you're wondering about that gorgeous embossed butterfly background, it's the Beautiful Butterflies embossing folder. As it's a hybrid folder, it is part of the Beautiful Butterflies die set and cannot be purchased separately. 

The team and I would love to see what you cook up with this recipe. Visit the As You See It page to see what the rest of the team have done and to link up your entry. You can join in the challenge until Wednesday February 19, 11.59pm PST.


If you live in New Zealand and don't have a Stampin' Up Demonstrator, I'd love to be yours. I can help you with ideas, get you catalogues and provide you with Stampin' Up products. You can leave a message in the comments or contact me using any of the methods listed in the Contact Me tab at the top of the page. 

You can shop with me from  anywhere in New Zealand here.

Friday, 26 April 2024

Thoughtful Wishes for AYSI 322

 Welcome to a new challenge at As You See It Challenge. After the colour challenge, it's always a 'fill in the blank' and with those, you never quite know what you're going to get. This time is was a challenging one - what is my least used colour? And what's yours?

There's a few colours that would have completed the sentence but they all come from the same group of colours. For some reason, I shy away from orangey colours. I never got friendly with Grapefruit Grove or Pale Papaya. Peach Pie might be a challenge. I can use Calypso Coral at a pinch. But really, if I didn't own Pumpkin Pie, it really wouldn't bother me at all. So that's it - PUMPKIN PIE is officially my least used colour. 

I thought it didn't look too bad with Pebbled Path, so that's what I used for this card. 


I started by white embossing the leaf stem from Thoughtful Wishes on to Fluid 100 Watercolor paper. 
Then I blended Pumpkin Pie ink over it, making sure to have it heaviest at the bottom and getting lighter as it went up the page. 

Then I added some splashes of water to lift the colour slightly in places and gave it a light spritz with water.


Once it was dry, I stamped some more of the stems in Pumpkin Pie over the top, making sure to have a variety of heights.

Before mounting it onto a piece of Pebbled Path card, I added three strands of Pebbled Path jute twine around it. I got the three strands by cutting a length of twine and pulling out the individual strands of twine.

The matted piece is attached to a Pumpkin Pie card base. I used another strand of the twine to tie a bow around the three horizontal strands. 

The sentiment is white embossed on Pebbled Path and is cut with one of the dies from the new Unbounded Love dies.

Both Unbounded Love and Thoughtful Wishes are in the 2024-25 Annual Catalogue, coming live on May 1.

Make sure you visit the As You See It page to see what the rest of the Design Team have with this sketch - and to link up your own entry.

If you live in New Zealand and don't have a Stampin' Up Demonstrator, I'd love to be yours. I can help you with ideas, get you catalogues and provide you with Stampin' Up products. You can leave a message in the comments or contact me using any of the methods listed in the Contact Me tab at the top of the page.

You can shop with me from anywhere in New Zealand here.


Wednesday, 8 February 2023

Waves of Inspiration for Around the World on Wednesday


Thank you for joining in with the latest hop from the crew at Around the World on Wednesday. If you haven't hopped with us before, we're a group of Stampin' Up! Demonstrators from every time zone in the world where Stampin' Up! operates. We share with you on the first Wednesday of each month. You're here with me, in New Zealand.

Each month we present a different theme to inspire you to create.

This month, our theme is Embossing. We could choose to use any form of embossing, and I've gone for resist embossing.

I have enjoyed the Waves of Inspiration set and for this challenge, have revisited a card I made using ink layers and substituted resist embossing to see what happened. You can see the original card here.

I started with a piece of Basic White card and white embossed the big wave image onto it. Using blending brushes, I added Balmy Blue, Tahitian Tide and Starry Sky into the wave and some Tahitian Tide and Starry Sky to the skyline. Then, I added in some Daffodil Delight, taking card not to mix too much and create a green sky by mistake! I stamped in a single seabird.


After wiping over with a tissue to remove any excess ink from the embossed area, I cut the panel into strips: 3 x 3cm, 1 x 2cm and 1 x 1.5 and adhered them to a piece of Basic White.

That was mounted on a matte of Tahitian Tide. The ribbon and sentiment were added before adhering to the Starry Sky card base. I added a trio of Basic Rhinestones for a touch of bling.

Next up on our Technique: Embossing Inspiration Hop is the ever-creative Leonie Stuart.


If you get lost along the hop, or encounter a broken link, you can get back on track by using the links below.

Jan Clothier - NZ (You are here)  

Leonie Stuart - AU

Rochelle Laird-Smith - AU

Cheryll Miller - AU

Melissa Gifford - AU

Danielle Kassing - NL

Ximena Morales - DE

Aurélie Fabre - FR

Mikaela Titheridge - UK

Tina Zinck-MacDonald - CA

Annette Ball - CA

Angie McKenzie - US

Wendy Lee - US

Shel Anderson - CA

Chris Smith - US

Tricia Butts - US


If you live in New Zealand and don't have a Stampin' Up Demonstrator, I'd love to be yours. I can help you with ideas, get you catalogues and provide you with Stampin' Up products. You can leave a message in the comments or contact me using any of the methods listed in the Contact Me tab at the top of the page. You can shop with me from anywhere in New Zealand by clicking on the SHOP NOW button in the sidebar or on any of the products below.

Product List

Wednesday, 26 October 2022

Lights Aglow for Colour INKspiration 132


Welcome to the latest challenge at Colour INKspiration. This tropical palette was chosen for us by Crew Member, Cathy Pinchbeck.


If you haven't played with us before, we are a group of Stampin' Up Demonstrators from the South Pacific. Challenges are shown and entered via our Facebook Group page. If you don't belong, and would like to, click here. Don't forget to answer the three easy questions you'll be asked when you ask to join the group.

Each challenge, Top Picks and a winner are chosen by the crew and the winner offered a chance to Guest Design with us for a future challenge. We welcome Joy Judd as our Guest Designer for this challenge.

If you don't have an exact challenge colour, feel free to replace it with whatever you have that's closest, for example Night of Navy for Starry Sky. Black, White, Very Vanilla, Crumb Cake, Sahara Sand and metallics are free colours, as are flesh toned Stampin' Blends.

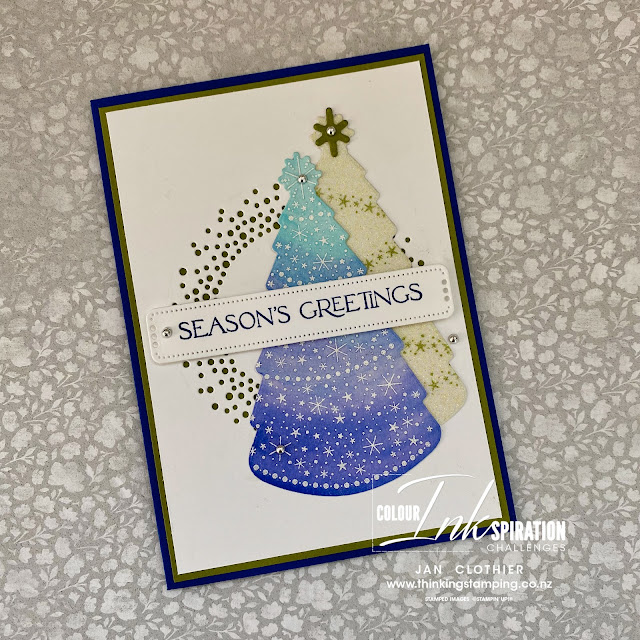
These colours didn't quite shout 'Christmas' at me but my As You See It teammate, Heather Cooper from Canada, made a lovely card a while ago using a resist embossed Christmas tree in blues which I really admired. So the three blues in this palette seemed a great chance to try out something similar.

For the first tree, I white embossed the tree image onto Shimmery Cardstock then painted it with the widest waterpainter in Tahitian Tide, Orchid Oasis and Starry Sky.


For the second tree, I cut an outline in the Very Vanilla glimmer paper from the variety pack and stamped the garland over it in Old Olive.

I backed the white card base in Old Olive so it would peep through the circular die cut. 

The sentiment is stamped in Starry Sky, die cut and popped up on dimensionals.

We'd love to have you join in the challenge with us. Visit the Colour INKspiration site to check out the album of Crew Cards for inspiration. You can also add your entry there. We all enjoy seeing what you do with our colour palettes, so join in!

If you live in New Zealand and don't have a Stampin' Up Demonstrator, I'd love to be yours. I can help you with ideas, get you catalogues and provide you with Stampin' Up products. You can leave a message in the comments or contact me using any of the methods listed in the Contact Me tab at the top of the page. You can shop with me from anywhere in New Zealand by clicking on the SHOP NOW button in the sidebar or on any of the products below.


Product List

Saturday, 26 September 2020

Queen Anne's Lace for Stampin' Up!'s Facebook Page

 In addition to participating in regular Blog Hops, the Stampin' Up! Artisan Design Team also bring you weekly Instagram Tips and Tricks and do a number of posts for the Stampin' Up! Facebook Page. This week, it was my turn to share something on the SU Facebook page, in the form of a photo album. I'm doing this post as I know that more than a few of my customers and followers are not Facebook people and I'd love you to see these too.

I chose to share a favourite set, Queen Anne's Lace, and a favourite technique - sponging.

Here are the three cards I made for this album and a brief explanation of how I did them. You can also see these by going to Stampin' Up's Facebook page and looking at the albums - and you'll also see the work of the other Artisans. (Until recently, these projects were shared in the now-unavailable Notes section.)


1. Sponged Masked Column card


I started by masking off a column 3.5cm wide on a piece of Shimmery Card Stock (item 121717) and sponging it with following inks: Mossy Meadow (item 147111), Old Olive Ink (item 147090), Rich Razzleberry (item 147091) and Crushed Curry (item 147087). Then I used the two-step floral stamp from Queen Anne’s Lace (Item 152607) in Mossy Meadow and Rich Razzleberry  inks before adding in some stem-only stamps in Old Olive. The panel was cut using the largest of the Stitched Rectangle dies (item 151820), mounted on a Crushed Curry (item 131288) mat which had been embossed using the Tasteful Textures 3D embossing folder (item 152718). The sentiment, one from Queen Anne’s Lace, was stamped in Tuxedo Black (item 132708) before the whole front was added to a Rich Razzleberry (item 119981) base. Gilded Gems (item 152478) were the finishing touch as the opulence of the gold suited the richness of the Regal colours.

2. Faux Torn Paper Mask with Resist Embossing


Using a mask of torn copier paper, I stamped some of the flower stem stamps from Queen Anne’s Lace (item 152607) in Versamark (item 102283) and embossed the images using White Embossing Powder (item 109132). Then I used the following inks to sponge over the exposed area: Old Olive (item 147090), Rich Razzleberry (item 147091) and Crushed Curry (item 147087).  The sponging highlights the white embossed flower stems. Before removing the mask, I added in some of the same stem images in Crushed Curry. The sentiment is stamped in Tuxedo Black (item 132708 ) and die cut using one of the Tasteful Labels dies (item 152886). As in the first card, the panel is cut using the largest of the Stitched Rectangles dies (item 151820) and mounted on a mat of Crushed Curry (item 131288) embossed using the Tasteful Textiles embossing folder (item 152718). The front is mounted onto an Old Olive (item 106576) base. Three Gilded Gems  (item 152478) complete the card. 


3. Window Card with a Simple Sponged background


I started with a piece of Whisper White card (item 106549) and stamped the flower stem image from Queen Anne’s Lace in the bottom corner twice in Old Olive ink. After placing it on top of the Rich Razzleberry base, I used the second largest of the Stitched Nested Labels dies  (item 149638) to cut a window through both layers. I lined up a piece of Crushed Curry under the window in the white piece and cut out a smaller window using the next-size-down die. The white piece was embossed with the Dainty Diamonds embossing folder (item 152712). The Crushed Curry window is sandwiched between the base and embossed white piece so that only the inner window edge is showing. The sentiment was die cut using  one of the Tasteful Labels dies (item 152886). After pencilling in the outline of the window on the white card inner, I stamped the two-step floral stamp in Old Olive and Rich Razzleberry and the stem only in Old Olive. Then I sponged over the whole image lightly in Crushed Curry to ground the image and to suggest a hint of  sunshine.


Here's what it looks like open.


If you live in New Zealand and don't have a Stampin' Up! Demonstrator, I'd love to be yours. I can help you with ideas, get you catalogues and provide you with Stampin' Up products. You can leave a message in the comments or contact me using any of the methods listed in the Contact Me tab at the top of the page. And remember, you can shop with me from anywhere in New Zealand by clicking on the SHOP NOW tab in the sidebar.