Showing posts with label Colour challenge. Show all posts

Sunday, 12 April 2026

Simply Beautiful for The Paper Players 781

Hello everyone! It's time for a new challenge at The Paper Players and this week, I'm your hostess. I've chosen a bold colour combination for us to play with this week: Basic Black, Smoky Slate and Daffodil Delight. Of course, white is a free colour.


I did have a brief moment when I wondered what I'd been thinking when I chose these colours but very quickly settled into creating and really enjoyed the challenge of combining them. 

Yellow had me thinking of roses, as I had a beautiful yellow rose at my old house called Yabadabadoo. So I stamped the gorgeous bloom from Simply Beautiful in Tuxedo Black and coloured it loosely with Daffodil Delight and a small blending brush. I stamped the foliage in Tuxedo Black and coloured them with Smoky Slate, again with a small blending brush. Then I die cut them.


I embossed a Basic Black card front with the Forever Plaid folder then splattered it with some diluted White Craft ink and some Wink of Stella


After attaching the card front to a Basic Black card base, I arranged the flower and leaves. The flower is popped up on dimensionals.

The sentiment is from Rolling Waves and cut with a banner from Stylish Shapes.  The 'Happy Birthday' is on the inside.

I hope you take up the challenge of using these colours - and that you enjoy them. The whole team would love to see what you do. You can see what the rest of the team have done and link up your own entry at The Paper Players.

Here's a quick recap of our challenge rules:

  1. Create a new paper-craft project specifically for this challenge.
  2. Upload your creation to your blog with a link back to us.
  3. Please provide a direct link to the post featuring your challenge entry.
  4. Please link your card to no more than four challenges, TOTAL, including ours
  5. Have fun, and thank you for playing with us!
Don't forget to check out the great inspiration from the rest of the design team.

Anne Marie Hile (on leave)
Jan Clothier - You are here

You can stamp with me, and shop with me, from anywhere in New Zealand. Click here.


Sunday, 9 November 2025

Friendly Foliage for Paper Players 763

Hello and welcome to the latest challenge at The Paper Players! LeAnne's Harvest themed challenge last week brought some gorgeous entries into the gallery. I'm hostess this week with a colour challenge for you, and I hope you'll enjoy playing with it. Will you make an autumn card with these rich colours or something else entirely?


I'm really enjoying the Friendly Foliage bundle, one of the new Online Exclusives for November. I've done a few things with the framed leaves stamp and die and wanted to concentrate on using the extra leaves in the die set. There are a couple of skeleton leaf type dies in the set. Ever since I saw my team-mate Joanne make a card that inset the dies, I was wanting to have a go at something like it. 


For this inlay die technique you need three things.
  1. You have to be slightly mad
  2. You need to have some patience
  3. You need to own a take-your-pick tool
I started by cutting out several of the leaves in all of the challenge colours, making sure to keep all the little bits that fall out of the leaf outline.Then I picked three long pointy skeletons and two of the rounded leaf ones and adhered them to the Basic White card front, evenly spaced out. 


Then came the part where steps 1-3 come in. I had a smear of liquid glue on my silicon mat, picked up random pieces with the sticky end of my take-your-pick tool and inserted it into the corresponding place in the outlines. Carry on like this until all the outlines are filled in.

Once that was done, it was plain sailing. Add the sentiment in Early Espresso. Adhere the panel to a pice of Mossy Meadow DSP. Adhere to an Early Espresso card base. Add embellishments - in this case, three of the green Sparkle Dots.

It really isn't as pernickety as it sounds to do this, especially if you can lift off the skeleton outlines of the leaves and leave the cut out bits still sitting in place on the cutting plate. Then it's easy to see where they fit back in. Anyway, if you give this a go I'd love to see how it turns out for you. 😀

You can see what the rest of the team have done and link up your entry on The Paper Players page. 

Here's a quick recap of our challenge rules:
  1. Create a new paper-craft project specifically for this challenge.
  2. Upload your creation to your blog with a link back to us.
  3. Please provide a direct link to the post featuring your challenge entry.
  4. Please link your card to no more than four challenges, TOTAL, including ours
  5. Have fun, and thank you for playing with us!
Don't forget to check out the great inspiration from the rest of the design team.

Anne Marie Hile (on leave)
Jan Clothier - You are here

You can stamp with me, and shop with me, from anywhere in New Zealand. Click here.


Friday, 19 September 2025

Prairie Grass for As You See It 357

 Welcome to a new challenge at As You See It. As always, a sketch challenge is followed by a colour challenge. This week, we're delving into some of Stampin' Up!'s 2025 In Color range. So often with the In-Colors, I look at an individual colour and it doesn't grab me but when you put them together, they're a great team. I think that's very true of this year's colours. I've become especially fond of Secret Sea and the Secret Sea/Cloud Cover combo. Anyway, we'd love to see how you see these colours working together.

Regular readers will know that  I've been experimenting a lot lately with circle masks as backgrounds for other stamps. This card is an extension of that playaround.

I started by stamping the grass image using two of the stamps from Prairie Grass in Secret Sea. The I used some masks I'd cut from scraps of window sheet using various sizes of circles to lay down some background pops of colour in Cloud Cover, Pumpkin Pie and Timid Tiger.


Then, I wondered what to try next. So I embossed the lefthand side of the card front using one of the folders from Glass & Gardens.


After stamping the sentiment in Secret Sea,  I used one of the rounded rectangle dies from Nested Essentials to cut out the sentiment. I attached the card front to the Secret Sea card base but added in a panel of Timid Tiger underneath where I'd cut out the sentiment label. Then I popped the sentiment back into place on dimensionals, which allows for a pleasing flash of colour to peek out from behind. 

I added a trio of Flat Pearls, one in Timid Tiger and two Secret Sea to finish off. 

So how do YOU see these colours?  Visit the As You See It page to link up your entry and to see the rest of the team's inspirations.

If you live in New Zealand and don't have a Stampin' Up Demonstrator, I'd love to be yours. I can help you with ideas, get you catalogues and provide you with Stampin' Up products. You can leave a message in the comments or contact me using any of the methods listed in the Contact Me tab at the top of the page. 

You can stamp with me, and shop with me, from anywhere in New Zealand. Click here.


Sunday, 13 July 2025

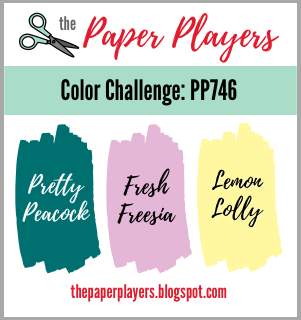
Impressions Abloom for PP746

Welcome to a new week at The Paper Players, where Ann is our hostess this week. She has a pretty colour combination to inspire us.  


Of course this colour palette lead me to florals and from there it was a short step to reach for the Impressions Abloom bundle.


I really love the dies that come in this bundle, so I started by cutting a variety of flowers, centres and leaves in Basic White. Then I added colour with a blending brush: Pretty Peacock to the leaves, Lemon Lolly to the centres and Fresh Freesia to the flowers. The smaller flowers were sponged lightly and from the outside towards the centres so the edges were darker. Then I decided I needed some more variation, sot I took to the large flower with a very heavy hand! I certainly got the variation I was after - maybe even more than intended!


I embossed the Basic White card front with the Pressed Flowers embossing folder before arranging the coloured die cuts over it. The card base is Pretty Peacock.


The sentiment, from Impressions Abloom, is stamped in Pretty Peacock and cut with a banner from Stylish Shapes.  I cut a smaller banner in Pretty Peacock to create an accent for the sentiment. The embellishments are from the Pretty Peacock and Petal Pink Foiled Gems, now retired.

What will you do with Ann's pretty colours? You can see what the rest of the team have done and link up your entry on The Paper Players page. 

Here's a quick recap of our challenge rules:
  1. Create a new paper-craft project specifically for this challenge.
  2. Upload your creation to your blog with a link back to us.
  3. Please provide a direct link to the post featuring your challenge entry.
  4. Please link your card to no more than four challenges, TOTAL, including ours
  5. Have fun, and thank you for playing with us!
Don't forget to check out the great inspiration from the rest of the design team.

Anne Marie Hile (on leave)
Jan Clothier - You are here


If you live in New Zealand and don't have a Stampin' Up Demonstrator, I'd love to be yours. I can help you with ideas, get you catalogues and provide you with Stampin' Up products. You can leave a message in the comments or contact me using any of the methods listed in the Contact Me tab at the top of the page. 
You can stamp with me, and shop with me, from anywhere in New Zealand. Click here.


Sunday, 11 May 2025

Cheers & Sips for Paper Players 737

Hard to believe it but it's already time for a new challenge at The Paper Players. We were delighted by the entries in Joanne's 'Something Old, Something New' challenge. We hope you'll have as much fun with Ann's colour challenge. 


While these colours did sing of flowers to me, it was the Cheers & Sips bundle that ended up getting an outing instead. It's still on my desk as I'm prepping for the Creativity Abounds Virtual Stamp Camp at the end of June. If you're interested in joining me, and the other 12 members of the international crew, for this stamp camp you can read the details here.

The card base is Lost Lagoon, with a jauntily  askew piece of Berry Burst as a matte. The Basic White card front is embossed with one of the Glass & Garden embossing folders.


I used Versamark to stamp an image of each of the glasses and added some ice cubes to each. Then I used WOW White Embossing Powder and heated it up. Then I sponged over Bubble Bath ink and Berry Burst ink with a blending brush


I used the same resist emboss technique to create the umbrella, strawberry and mint leaf. The sentiments were stamped in Lost Lagoon ink. 

Then I added the mocktail glasses to the card front, popping the Bubble Bath long glass up on dimensionals.

To finish off, I added in a trio of Berry Burst tinsel gems - which have sadly just retired but can still be snapped up on the Last Chance list.

You can see what the rest of the design team have done, and link up your entry, at The Paper Players page.

Here's a quick recap of our challenge rules:
  1. Create a new paper-craft project specifically for this challenge.
  2. Upload your creation to your blog with a link back to us.
  3. Please provide a direct link to the post featuring your challenge entry.
  4. Please link your card to no more than four challenges, TOTAL, including ours
  5. Have fun, and thank you for playing with us!
Don't forget to check out the great inspiration from the rest of the design team.

Anne Marie Hile (on leave)
Jan Clothier - You are here


If you live in New Zealand and don't have a Stampin' Up Demonstrator, I'd love to be yours. I can help you with ideas, get you catalogues and provide you with Stampin' Up products. You can leave a message in the comments or contact me using any of the methods listed in the Contact Me tab at the top of the page. 

You can stamp with me, and shop with me, from anywhere in New Zealand. Click here.


Wednesday, 13 November 2024

Around the World on Wednesday November


Welcome to the latest hop at Around the World on Wednesday!

On the second Wednesday of each month, the team put together a thematic hop to give you some inspiration for your own crafting. We love it when you try out something new or CAS(E) one of our projects. The team is truly international, with members from each time zone of the world that Stampin' Up! operates. You're with me, in New Zealand - the first place in the Stampin' Up! world to change the date. 😀

Our inspiration this month is a Christmas Colour Challenge. Our team leader, Angie, has given us a choice of working with either at Coastal Colour palette or a Traditional Colour palette.


I don't think much guesswork will be needed to see that I've gone for a traditional palette!

Normally, I tend to inhabit a relatively Clean and Simple crafting realm... but I do like to go on holiday sometimes and to do things differently. It often seems to happen around Christmas that I go all vintage or shabby chic or distressed. 😀

I'm not quite sure what this one is but definitely not CAS!


I used the Decorative Trees bundle for this one. It's been such a great bundle this season - I think this one is going into my keepers shelf! The tree itself it quite straightforward: A simple die cut in Shaded Spruce brushed around the edges in the same coloured ink, then a gold foil die cut overlay added in. I gold-embossed the sentiment onto Cherry Cobbler,  cut it into pieces and assembled it on the tree. The gold stars are dies cuts from the Decorative Trees too.

Most of the fun part though was creating the background. The starting point was a piece of Cherry Cobbler cardstock embossed using the Distressed Tile 3D embossing folder then there was a lot of sponging, blending, splattering and embossing. As I say, the fun part!

You can see how I did it in this tutorial. Messy but actually very easy. 

The gold cord is one of the new online exclusives. It can be viewed, as can all Stampin' Up! products, in my online store. 

So, are you a Traditional Christmas person or more of a Coastal Christmas person? Keep on hopping to see what the rest of the team are thinking! Next up is Leonie Stuart from Australia, a demonstrator whose work I admire greatly. 


If you get lost on the hop or want to revisit anyone, here's the blog roll.


Friday, 12 April 2024

Gorgeous Garden for AYSI 321

 Two weeks have flown by and it's time for a new challenge at As You See It. As always, after a sketch challenge comes a colour challenge. Aren't these colours lovely? The rules for a colour challenge are that you must use all the given colours in some way but no other colours except a neutral of your choice. 

Usually, my neutral is Basic White. But I've gone a bit rogue on this one and have used Basic Black instead!

I ink smooshed the four colours on a piece of Fluid 100 Watercolor paper. I did arrange them in a loosely ombre fashion, moving from Daffodil Delight, to Bubble Bath, to Flirty Flamingo, to Calypso Coral.

From a piece of Basic Black, I die cut the foliage die from the Gorgeous Garden dies and backed it with the ink smooshed panel. 

This lovely pair of dies is available, heavily discounted, in the current Last Chance Sale. If you don't already have them, why not treat yourself?


The sentiment, from Inked & Tiled, is white heat embossed on Basic Black and cut using one of the Everyday Details dies. It's backed with one of the circles from Stylish Shapes cut in Calypso Coral.

For embellishments, I coloured some Basic Rhinestone Jewels with a dark Calypso Coral Stampin' Blend.

Make sure you visit the As You See It page to see what the rest of the Design Team have with this sketch - and to link up your own entry.

If you live in New Zealand and don't have a Stampin' Up Demonstrator, I'd love to be yours. I can help you with ideas, get you catalogues and provide you with Stampin' Up products. You can leave a message in the comments or contact me using any of the methods listed in the Contact Me tab at the top of the page.

You can shop with me from anywhere in New Zealand here.

If you purchase Gorgeous Garden from me, you will receive as a free gift, a tutorial bundle. This will give you step-by-step instructions for four original projects: two by me and two by UK Demonstrator Joanne James, aka The Crafty Owl.


Other Tutorial Gifts with Purchase from Joanne and Jan are:
  • Cheerful Daisies bundle
  • Hooray for Surprises bundle
  • Gorgeously Made bundle
Simply purchase the bundle and we'll give you the inspiration to get going with it!


Wednesday, 10 April 2024

Trusty Tools for Colour INKspiration 163


Welcome to 163rd challenge at Colour INKspiration. This bright, almost rainbow palette was chosen for us by crew member Monica Formosa.


If you haven't played with us before, we are a group of Stampin' Up Demonstrators from the South Pacific. Challenges are shown and entered via our Facebook Group page. If you don't belong, and would like to, click here. Don't forget to answer the three easy questions you'll be asked when you ask to join the group.

Each challenge, Top Picks and a winner are chosen by the crew and the winner offered a chance to Guest Design with us for a future challenge. We're very pleased to welcome Teah Karr Woodward as our Guest Designer for this challenge. This challenge is open for two weeks and closes Monday 22 April, 7pm AEST.

If you don't have an exact challenge colour, feel free to replace it with whatever you have that's closest, for example Daffodil Delight for Crushed Curry. Black, White, Very Vanilla, Crumb Cake, and metallics are free colours, as are flesh toned Stampin' Blends.

I had a class last weekend and one of the participants talked about how she was doing things to thank the people who were painting  her house. The idea must have stuck because the next thing I knew, I was digging out Trusty Tools to make this card!

 
I even used the Painted Texture embossing folder to partially emboss the background!


You can see how I made it, including easy partial embossing and some tips on getting accurate die cuts in the tutorial.


You can see what the rest of the Design Team have done with these colours in the Crew Inspiration Album on the Colour INKspiration Challenge Facebook page.

If you live in New Zealand and don't have a Stampin' Up Demonstrator, I'd love to be yours. I can help you with ideas, get you catalogues and provide you with Stampin' Up products. You can leave a message in the comments or contact me using any of the methods listed in the Contact Me tab at the top of the page. 

You can shop with me from anywhere in New Zealand by clicking here or any of the products below.

Product List