Monday 30 March 2020

Lockdown Layouts 2

If you missed the first Lockdown Layout, this is a special series to help you beat any boredom that comes with the month of lockdown. The Lockdown Layout series concentrates on showing you some simple layouts and projects that you can make by adapting whatever supplies you have on hand.

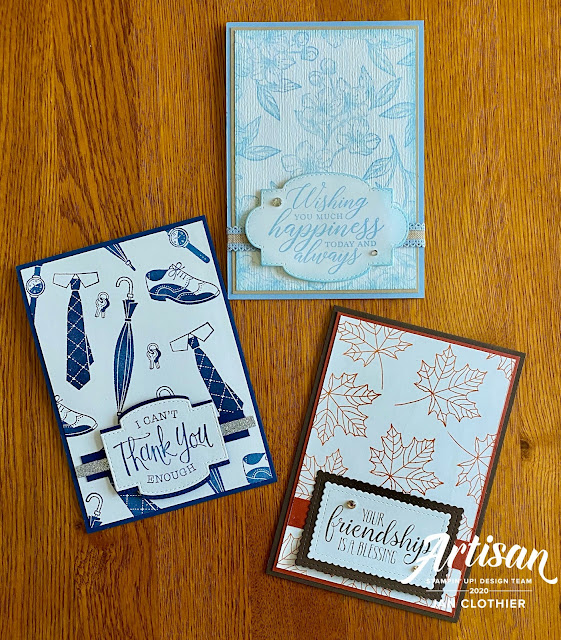
Lockdown Layout 1 concentrated on using DSP with a large punched or die cut sentiment. Today's projects go one step further. What do you do if you have no DSP? Simple - use your stamps to make some. These three cards are variations on a theme. Each uses a different stamp set but all three use So Sentimental stamp set and Stitched So Sweetly dies.


Card 1


1. Select a stamp set. Pick an image. I've used the skeleton leaf from Colourful Seasons.

On a piece of Whisper White 9.5cm x13.8cm, repeat stamp the image. I've used Cajun Craze ink.

Helpful Hint: Start stamping from the centre and work outwards. Make sure that some are stamped off the edge so that the resulting card front looks like a piece of fabric that's been cut up.


2. Select a sentiment. Then select a punch or die that fits it.

 I've used So Sentimental stamp set and the matching Stitched So Sweetly dies. I've chosen two of the scalloped edged stitched rectangle dies to layer up. Look at what dies and punches you already have and see how they look layered up.


To finish up the card, I've layered the stamped front onto a piece of Cajun Craze, 10cm x 14.3cm. The card base is Early Espresso. To ground the sentiment, I've added in a strip of Cajun Craze, 10cm x 1.5cm.

Finally add some embellishments. I've added a couple of Champagne Rhinestones.

Variation: Stamp the image in two or three complimentary ink colours.

Card 2


Like the last card, the card front is made by repeat stamping an image in a single colour.  I've chosen the spray from Forever Blossoms and stamped in Seaside Spray. Start stamping from the centre and work outwards. 

The white is again 9.5 cm x 13.8 cm and the Crumb Cake mat is 10 cm x 14.3 cm.


Here are two ways you can add variation to your card front. The first is to emboss the card front. I've used the Subtle embossing folder. The second is to add some light sponged distressing around the edge of the card front. These two things will add a touch of vintage to the design.


In the finished card you can see another way to vary your design: use ribbon to ground the sentiment.

Helpful Hint: to add definition to a sentiment, sponge colour around the edge.


Card 3

This card uses the Well Dressed stamp set, a Sale-abration item. I've chosen it to demonstrate another variation on this technique: you can use different stamps to create the card front.

This card has no mat, so the base is 10 cm x 14.3 cm.


Again, the sentiment is from So Sentimental and the die is from the matching Stitched So Sweetly die set. 

Helpful Hint: To get the Night of Navy edging, cut a blank, cut it in half and adhere it to the back of the sentiment.


To finish off the card, used a Night of Navy strip of card 9cm x 1.5cm and strip of Silver Glimmer paper 0.5cm x 10cm. The sentiment is popped up on dimensionals. This is optional.


These designs are intended to give you some ways you might not have thought of to use your stash while you're in lockdown. 

Of course, if you see something you'd like to add to your craft collection then please feel free to order from me. At the moment, the Australian warehouse is still open and NZ Post is still delivering. There may be delays in delivering but to the best of my knowledge, you can still order.
UPDATE: Although orders can still be made, they will not be shipped until after the lockdown ends.

If you use this idea, please feel free to post a picture in the comments of my Jan Clothier - Independent Stampin Up Demonstrator Facebook page.

Product List

Sunday 29 March 2020

Lockdown Layouts 1

Since all of New Zealand is in total lockdown for the next four weeks, I'm doing a series of simple projects to help pass the time. You can adapt the ideas using whatever cardmaking supplies you already have in your stash, or you can order more Stampin' Up! items from me.

So the first of my Lockdown Layouts is a simple one using whatever DSP, and dies or punches, you have on hand. I'll be using some of the Peaceful Poppies DSP and the Painted Labels dies from the current January-June Mini Catalogue.

The layout is a simple one: a pretty DSP front with a large sentiment added on a die cut or punch. Along the way, I'll have suggestions for variations and upgrades to the basic idea that you might like to try.


1. Start with some DSP, cut to a standard size of 10 cm x 14.3 cm. Choose your base colour from one of the colours in the paper itself. For these pieces from the Peaceful Poppies DSP pack, I've used  Blackberry Bliss and Poppy Parade. Adhere the DSP using your adhesive of choice.

Helpful Hint: The Stampin' Up! catalogue shows you which colours are used in each pack of Designer Series Paper so you don't have to guess.


For variation, you can use a mat. Cut the DSP down to 9.5 cm x 13.8 and adhere it to a piece of plain cardstock (10 x 14.3 cm) before attaching it to the card base. Here, I've used Pool Party and Poppy Parade, both colours from the paper.


2. Select the sentiment you want from your stamps. I'm using Peaceful Moments.

3. Select dies and/or punches from your stash that fit the sentiment you want to use. I'm using the Painted Labels die set. I've used the same sentiment and same basic label shape for each of my three cards so I can give you some different ideas for using them.

Firstly, you can back the shape with a repeat in the same shape. Cut a blank in the colour you want, cut it in half then adhere it to the back of the sentiment.


You can see it here. To help ground the sentiment onto the background, I've added a 1.5 cm strip of Mossy Meadow card and the put the sentiment label to the left. Of course, you can put it anywhere you like. You can leave it blank or add an embellishment. I've added a silver Designer Element but you might find a button in your sewing box that would do the trick.


Secondly, you can layer shapes. It depends what you have - perhaps two different sized circles or ovals, maybe two different shapes. For this poppy card, I've used the scribbly circle shape in Granny Apple Green to back the sentiment label. For variety, I've popped the sentiment up on dimensionals. I've added in some plain rhinestones. 


Helpful Hint: Did you know that you can colour rhinestones any colour you like using Stampin' Blends?

In this variation, I've used a larger label shape to back the sentiment and centred it. Instead of rhinestones, I've used sequins as embellishments. What's in your stash that you could use?


4. Decorate the inside as you like. Here's what I did, using stamps from Painted Poppies and Stampin' Blends to colour them. You might also note the 0.5cm strip cut from the front with the mat being used to decorate the inside.


You can try this layout with any DSP you have, any sentiments you have as well as any dies or punches you have. Experiment with your embellishments. Experiment with where you put the sentiment on the card front. I'd love the see what you make!

Of course, if you see something you'd like to add to your craft collection then please feel free to order from me. At the moment, the Australian warehouse is still open and NZ Post is still delivering. There may be delays in delivering but to the best of my knowledge, you can still order.

If you use this idea, please feel free to post a picture in the comments of my Jan Clothier - Independent Stampin Up Demonstrator Facebook page.

Watch out for Lockdown Layouts 2. Subscribe to this blog so you don't miss out on it.

Product List

Saturday 28 March 2020

Good Morning Magnolia for CAS Colours and Sketches 363

This week's sketch at CAS Colours and Sketches is great: open, so lots of possibilities.


It had been a while since I'd had out Good Morning Magnolia, which is one of my favourite sets from the 2109-20 Annual Catalogue. So it was with great pleasure that I used it for this sketch. One of the small magnolias and a leaf is stamped directly onto the card front and a second flower stamped then die cut.


The images are coloured with Stampin' Blends alcohol markers, which give a rich colour and blend together well.


Finally, I've added in some sequins from the Woven Threads sequin assortment and added some pearls to the centre of the larger ones.

If you live in New Zealand and don't have a Stampin' Up Demonstrator, I'd love to be yours. I can help you with ideas, get you catalogues and provide you with Stampin' Up products. You can leave a message in the comments or contact me using any of the methods listed in the Contact Me tab at the top of the page. You can shop with me from anywhere in New Zealand by clicking on the SHOP NOW button in the sidebar or clicking on any of products below.


Product List