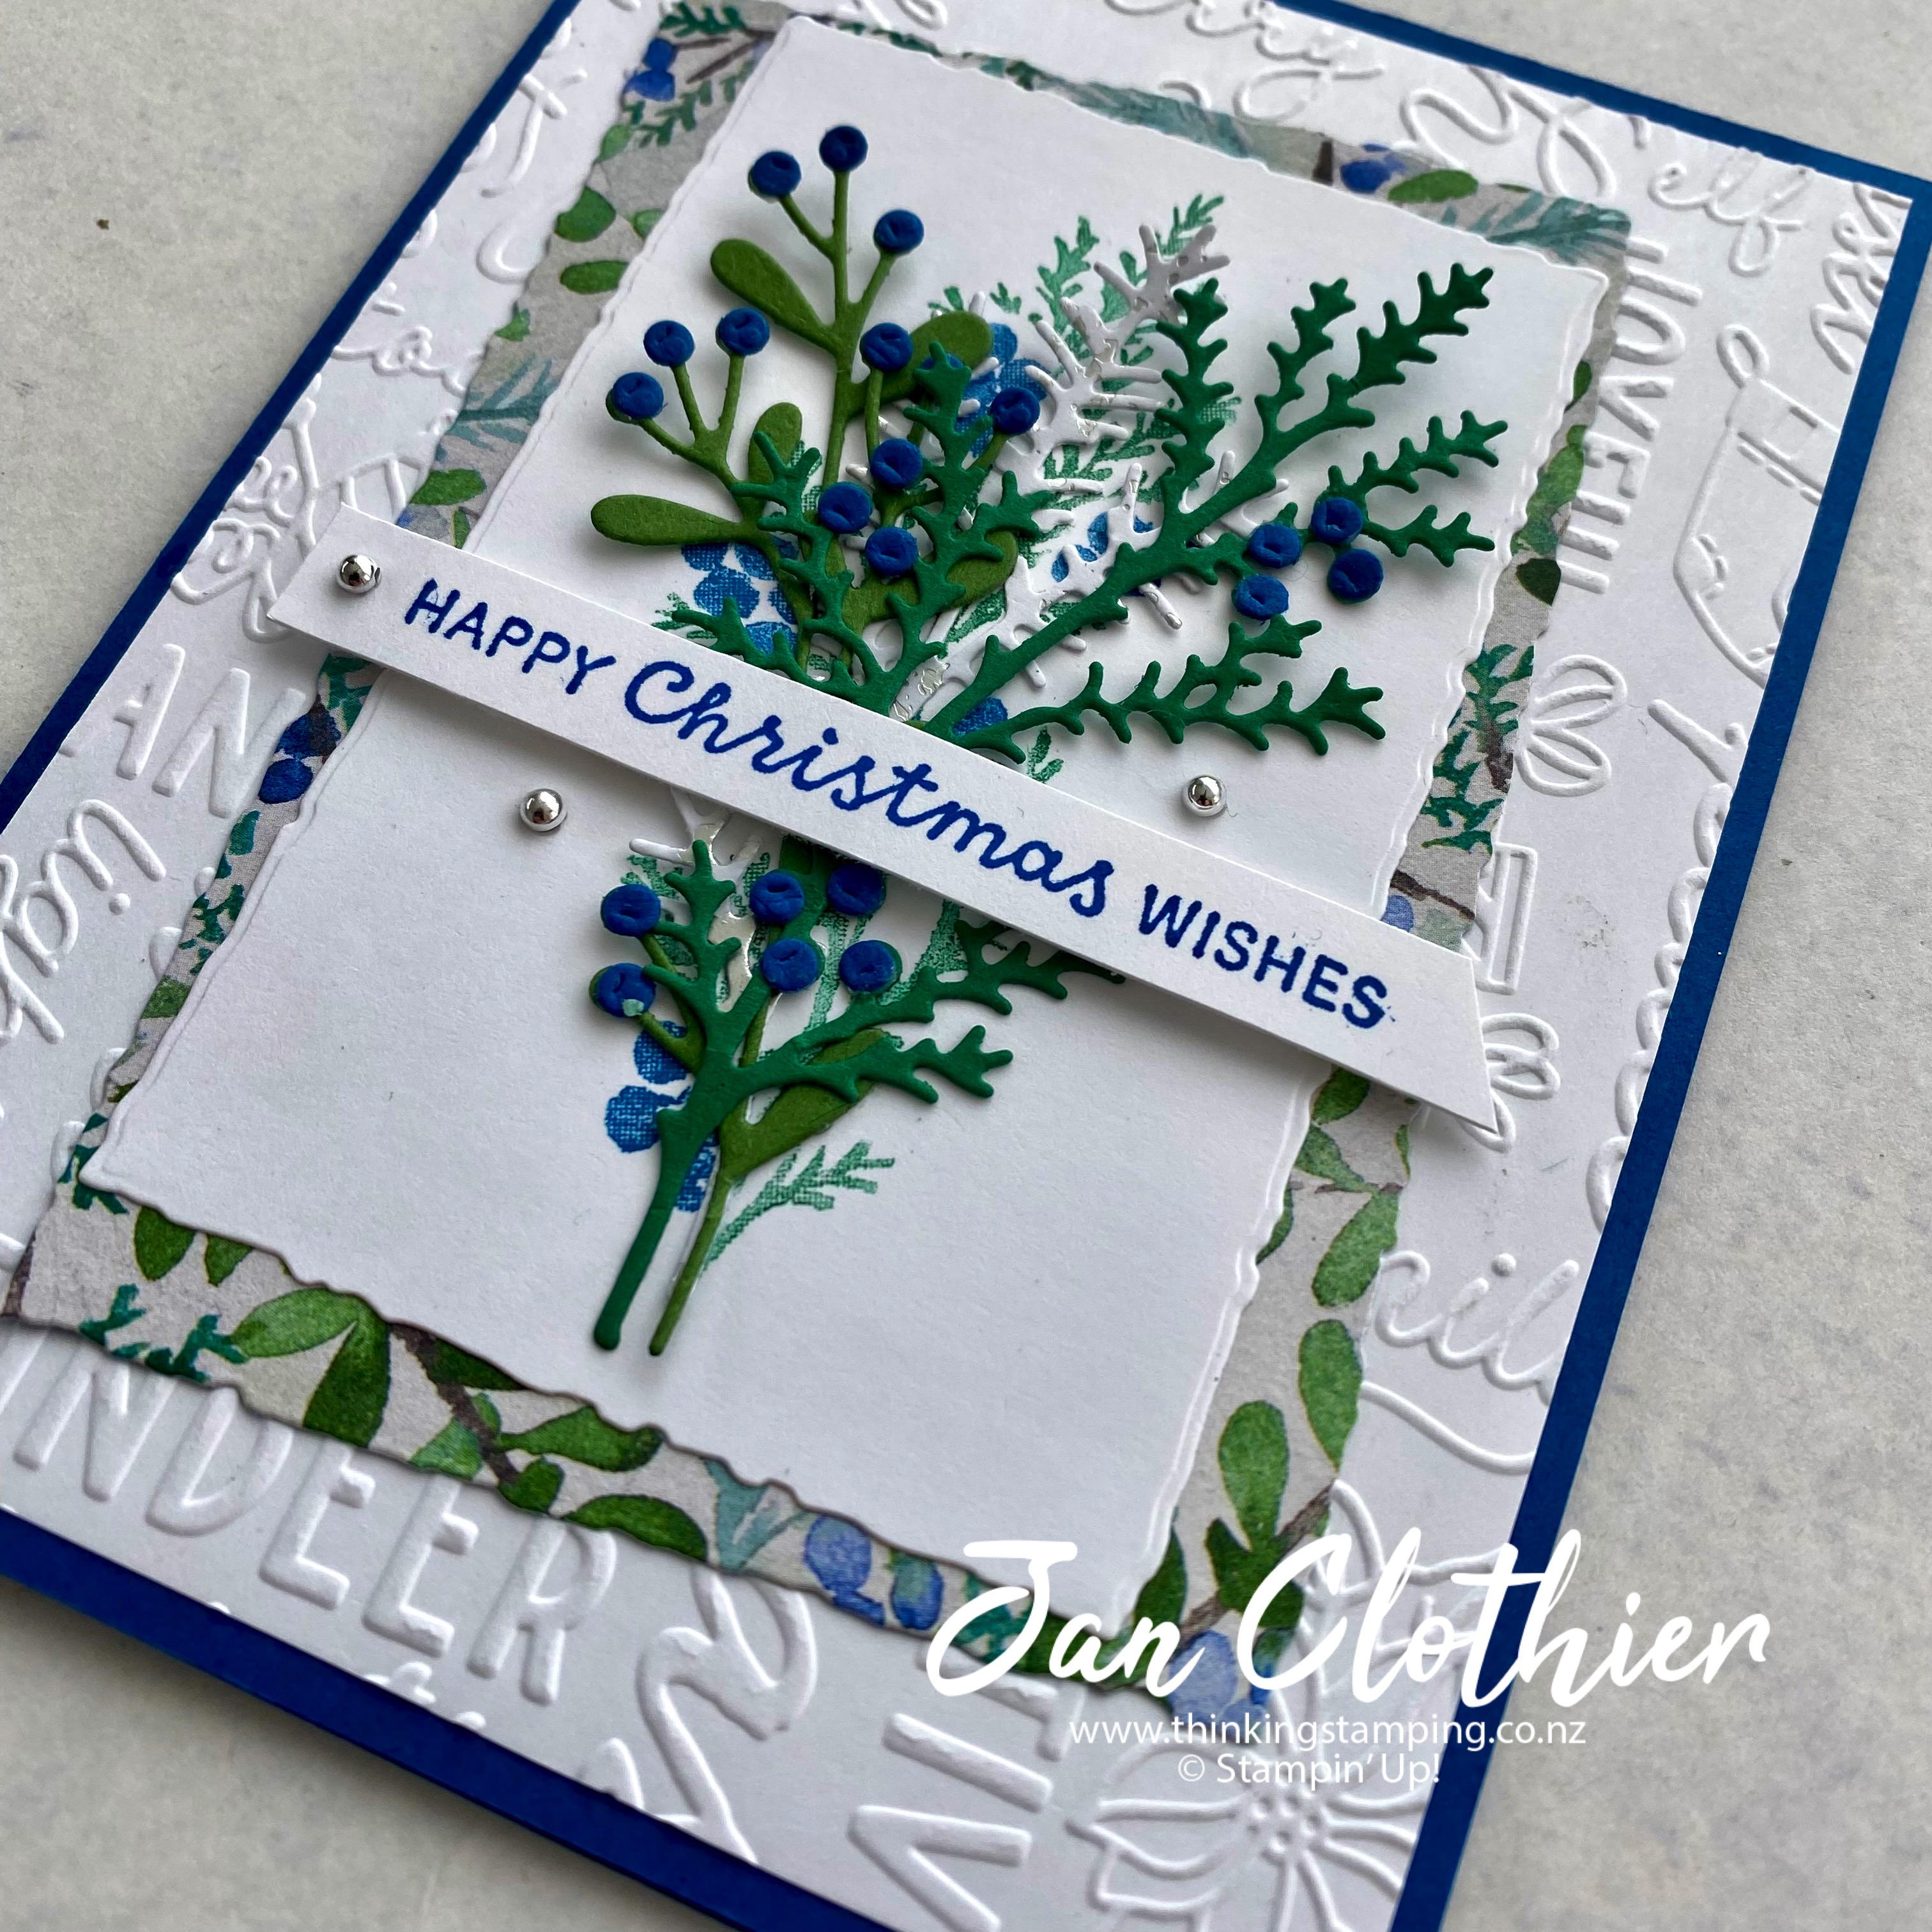
One of my favourite challenges is The Paper Players so I was delighted to find some time to play in their latest challenge, a sketch - my favourite kind of challenge.
I had the most amazing weekend recently at the Creativity Abounds Virtual Stamp Camp, which featured the Winter Meadow suite. I'm excited for the next one in early February 2024 - watch out for details. Since Winter Meadow was still on my mind, I got it out again for this challenge.
I used the Christmas Tidings embossing folder for the background and the sentiment is from Festive & Fun.
The Deckled Rectangle dies gave a nice point of interest to the edges of the rectangles.
If you live in New Zealand and don't have a Stampin' Up Demonstrator, I'd love to be yours. I can help you with ideas, get you catalogues and provide you with Stampin' Up products. You can leave a message in the comments or contact me using any of the methods listed in the Contact Me tab at the top of the page.
Update: Delighted to be A Cut Above at The Paper Players.
You can shop with me from anywhere in New Zealand by clicking here or on any of the products below.
Free Gifts with Orders
Any order of $90 will receive the Creativity Abounds Tutorial Bundle, with 13 projects based around the September - December Mini Catalogue, as a thank you gift.
And if you purchase the Joy of Noel bundle, you'll also receive a project bundle from 'Join in with Joanne and Jan' which will give you two project tutorials from me and two from my buddy Joanne James, aka The Crafty Owl.
Welcome to the latest challenge at Colour INKspiration. This bright palette was chosen for us by Crew Member, Rose Packer. Thank you to everyone who joined us for our last challenge. We hope you enjoy this one too. 😀
If you haven't played with us before, we are a group of Stampin' Up Demonstrators from the South Pacific. Challenges are shown and entered via our Facebook Group page. If you don't belong, and would like to, click here. Don't forget to answer the three easy questions you'll be asked when you ask to join the group.
Each challenge, Top Picks and a winner are chosen by the crew and the winner offered a chance to Guest Design with us for a future challenge. We welcome Yvon Doensen as Guest Designer for this challenge.
If you don't have an exact challenge colour, feel free to replace it with whatever you have that's closest, for example Real Red for Poppy Parade. Black, White, Very Vanilla, Crumb Cake, Sahara Sand and metallics are free colours, as are flesh toned Stampin' Blends.
With that gorgeous bush climbing up the wall in the graphic, I couldn't quite get past florals. Or walls. So I ended up reaching for the Timeless Arrangements bundle along with the Exposed Brick 3D embossing folder.
After embossing the square of Crumb Cake with the Exposed Brick 3D embossing folder, I sponged the edges with Crumb Cake ink.
I cut some of the foliage bars from the dies in Poppy Parade, Pool Party and Berry Burst and one in gold, plus some extra single stems of leaves in gold. Then I layered them up into two clusters and attached them to the centre of the card with one rotated 180 degrees to the other.
The sentiment is stamped in Crumb Cake and cut with one of the set's label dies. These little labels are so adorable that it worth the expense just to get them... and that great all-purpose happy sentiment. 😀
I've popped it up on dimensionals and added a swooshy gold bow made from the gold half of the Simply ElegantTrim combo. After that, I decided it didn't need any extra bling but of course, if you choose to CASE this project you're free to add some.
We'd love to have you join in the challenge with us. Visit the Colour INKspiration page to check out the album of Crew Cards for inspiration. You can also add your entry there. We all enjoy seeing what you do with our colour palettes, so join in!
If you live in New Zealand and don't have a Stampin' Up Demonstrator, I'd love to be yours. I can help you with ideas, get you catalogues and provide you with Stampin' Up products. You can leave a message in the comments or contact me using any of the methods listed in the Contact Me tab at the top of the page.
You can shop with me from anywhere in New Zealand by clicking here.
Free Gifts with Orders
Any order of $90 will receive the Creativity Abounds Tutorial Bundle, with 13 projects, as a thank you gift.
And if you purchase the Joy of Noel bundle, you'll also receive a project bundle from 'Join in with Joanne and Jan' which will give you two project tutorials from me and two from my buddy Joanne James, aka The Crafty Owl.
This month, the theme at Stampin' Fancy Friday is 'Gratitude'. We don't blog hop as such but the team at Stampin' Fancy Friday do a daily inspiration post on Instagram. The team at Stampin' Fancy Friday are all current or past members of Stampin' Up!'s Artisan Design Team, so it really is a great place to pick up ideas or recharge your creative mojo. Follow @stampinfancyfriday if you don't already. 😀
Today, I'm sharing my project which appeared on Instagram a few days ago. Regular readers will know that I have a real soft spot for the Gorgeously Made bundle, so I just couldn't help myself but to get it out again!
I enjoyed making this card so much that I made a video tutorial to share it with you. I hope you give it a go - it's much easier than it looks!
If you live in New Zealand and don't have a Stampin' Up Demonstrator, I'd love to be yours. I can help you with ideas, get you catalogues and provide you with Stampin' Up products. You can leave a message in the comments or contact me using any of the methods listed in the Contact Me tab at the top of the page.
You can shop with me from anywhere in New Zealand by clicking here.
Orders placed with me can earn free tutorials.
Any order of $90 will receive the Creativity Abounds Tutorial Bundle, with 13 projects, as a thank you gift.
And if you purchase the Joy of Noel bundle, you'll also receive a project bundle from 'Join in with Joanne and Jan' which will give you two project tutorials from me and two from my buddy Joanne James, aka The Crafty Owl.
Welcome to the new challenge at As You See It! This time, it's our 'fill in the blank' challenge and it's a good one!
This one really got me thinking because vellum has so many uses: alcohol ink blending, as a 'softening' panel, die cut pieces, heat embossing, colouring, stamping.... what IS my favourite? Well, I came down on... EMBOSSING. Vellum looks lovely when you run it through an embossing folder.
I had an as-yet unused folder sitting on my desk, Christmas Tidings. So I cut a piece of vellum, embossed it with Christmas Tidings and started building!
And it did kind of build as it went. I stamped and coloured the image from Festive & Fun, then dithered around about what to do with it. Solution - cut it out with one of the rounded corner rectangles from NestedEssentials dies. Problem - the die was not wide enough. Solution - extend the die cut.
Next problem - did placing the rhino image need something to ground it, or could it sit bare on the vellum? This lead to quite a long time of trying different slips of paper in various combinations - a ten minute speed challenge this was not!
Next problem - I got my heart set on having stitched banner ends on the bits of DSP I'd chosen. I don't know why as life would have been much simpler if I'd just cut strips and shaped the ends with scissors. 😂
Solution - cut two banners with Nested Essentials and create the illusion that it was all one.
Next problem - did all the wording on the vellum constitute a sentiment, or did I need something else? Solution - much moving sentiments in various permutations on and off. On and off. On and off. Did I mention that this was NOT an under-ten minute card??
Next problem - embellishment. Solution - thankfully, pretty straightforward. Some silver Festive Pearls.
Make sure you visit the As You See It Challenge page to see what other interesting things the team have done with vellum and to link up your own entry. You can join in with us until Wednesday November 1, 11.59pm PST.
If you live in New Zealand and don't have a Stampin' Up Demonstrator, I'd love to be yours. I can help you with ideas, get you catalogues and provide you with Stampin' Up products. You can leave a message in the comments or contact me using any of the methods listed in the Contact Me tab at the top of the page.
You can shop with me from anywhere in New Zealand by clicking here. Any order of $90 will receive the Creativity Abounds Tutorial Bundle, with 13 projects, as a thank you gift. And if you purchase the Joy of Noel bundle, you'll also receive a project bundle from 'Join in with Joanne and Jan' which will give you two project tutorials from me and two from my buddy Joanne James, aka The Crafty Owl.
Welcome to the latest hop with the Creativity Abounds team! We're a group of demonstrators from around the world who come together to share ideas and inspiration with you.
On the third Wednesday of the month (third Thursday if you're in New Zealand), we hop to share some inspiration with you on a particular theme or set. This month, we're featuring projects from the September-December Mini Catalogue.
My favourite bundle from the catalogue is Joy of Noel, so I've created one project to share with you today - and a second one as part of the Creativity AboundsTutorial Bundle for October. This 13 tutorial bundle is free from me with a qualifying purchase of $90 or more.
I've gone full-on traditional for this one: gold, red, green, pine needles. 😀
Despite the opulent appearance, this card is actually very simple to make.
Here's what you need.
Joy of Noel bundle
Deckled Circle dies (or similar)
Inks: Cherry Cobbler, Tuxedo Black, Versamark
Stampin' Blends: Cherry Cobbler, Granny Apple Green, Shaded Spruce
Gold embossing powder and heat tool
Distressed Tile 3D embossing folder
Brushed Metallic Adhesive dots
Cherry Cobbler
Card base 21cm x 14.8, scored at 10.5cm (8 1/2" x 5 1/2", scored at 4 1/4")
Basic White
2 pieces 10cm x 14.3cm (4" x 5 1/4")
1 piece 8cm x 8cm (3 1/4" x 3 1/4")
1 piece 8cm x 10 cm (3 1/4" x 4")
Gold Foil
4.5cm x 14.3cm (1 3/4" x 5 1/4")
Granny Apple Green
6cm x 12cm (2 1/2" x 5")
Shaded Spruce
6cm x 4cm (2 1/2" x 1 3/4")
Then you can either watch the video tutorial
or follow along here.
Fold and burnish the Cherry Cobbler base
Adhere the gold foil strip to one of the large pieces of Basic White, about 5mm (1/4") from the left hand edge.
Run this piece through your Stampin' Cut and Emboss machine using the Distressed Tile 3D embossing folder. Adhere to the front of the card base.
Using Tuxedo Black ink, stamp the large floral spray onto the smaller rectangle of Basic White. Colour using Stampin' Blends (or your chosen colouring medium) and die cut out.
Using Cherry Cobbler ink, stamp the NOEL centrally on the Basic White square. Then, using Versamark, stamp the 'Joyous' over the NOEL and gold emboss.
Cut the Joyous NOEL sentiment out using the Deckled Circle die that is sixth from the centre.
From the Granny Apple Green piece, die cut three pine needle shapes
From the Shaded Spruce piece, cut 5 small sprigs using the sprig die.
Adhere the coloured in Christmas spray on a slight angle on the left hand side of the card front, then arrange the pine needles and sprigs in a symmetrical and pleasing manner. Make sure they can still be seen when the NOEL circle is added. When you are happy with the arrangement, adhere them to the card front.
Add the sentiment circle using dimensionals.
Add three gold Brushed Metallic Adhesive dots to complete.
Decorate the second large rectangle of Basic White as desired and adhere to the inside of the card.
Here's a sneak peek at what's in this month's tutorial bundle.
And here's a closer peek at the card I've made that's part of the Creativity Abounds October Tutorial Bundle.
If you live in New Zealand and don't have a Stampin' Up Demonstrator, I'd love to be yours. I can help you with ideas, get you catalogues and provide you with Stampin' Up products. You can leave a message in the comments or contact me using any of the methods listed in the Contact Me tab at the top of the page.
You can shop with me from anywhere in New Zealand by clicking here. Don't forget if you purchase from me, you'll receive the thirteen tutorials in the Creativity Abounds Tutorial Bundle as a free gift.
This weekend is also the Creativity Abounds On line Winter Meadow Stamp Camp. It's still not too late to buy the Winter Meadow bundle and get your exclusive invite to the Camp, although you might have to make your projects after the event. If you missed out this time, we'll be holding another Stamp Camp early in 2024, so watch out for details closer to the time. 😀
Welcome to a new hop with the crew at Around the World on Wednesday. On the second Wednesday of each month, the team put together a thematic hop to give you some inspiration for your own crafting. We love it when you try out something new or CAS(E) one of our projects. The team is truly international, with members from each time zone of the world that Stampin' Up! operates. You're with me, in New Zealand - the first place in the Stampin' Up! world to change the date. 😀
This month, we had a sketch to work with. We actually had a choice of two to pick from, one with a bow and one without and I've gone for the 'without' option.
At heart, I'm a simple girl, so I'm always going to choose texture over pattern. So for me, the strong vertical became an embossed panel. I'd been very keen to try out the new Abundant Beauty Decorative Masks and this sketch gave me the perfect opportunity. After using them, I can tell you, they're the best value $22.25 you'll find in the catalogue!
The stencils are so very easy to use, with notches to assist with line-up and numbering to help you get it right. They can be used to create a flat pattern on paper or, as I've done here, fussy cut and arranged in layers. Colour combinations are endless for a myriad of looks.
You can see for yourself just how easy it is to create beautiful sunflowers - and to make this card - on the video tutorial below.
You'll find further wonderful inspiration from Leonie Stuart, who is next up on the hop.
If you live in New Zealand and don't have a Stampin' Up Demonstrator, I'd love to be yours. I can help you with ideas, get you catalogues and provide you with Stampin' Up products. You can leave a message in the comments or contact me using any of the methods listed in the Contact Me tab at the top of the page.
You can shop with me from anywhere in New Zealand by clicking here, or on any of the products below.
If you get lost on the hop, or encounter a broken link, here's a list of participants and links to help you navigate.


")
")


 Designer Series Paper")
 Specialty Designer Series Paper")


")


")


 Designer Series Paper")


