Sunday 27 October 2024

Cake Celebrations for Paper Players 713

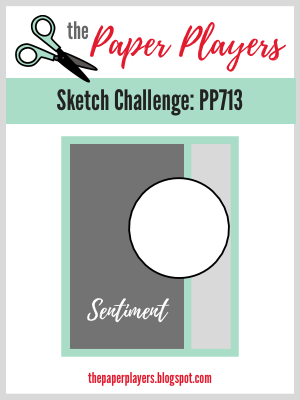
Time for a new challenge at The Paper Players! This time our hostess is Ann and she has a sketch challenge for us. 


Sketch challenges are my favourites. This time, I used it unashamedly to try out a new set that arrived during the week. The Cake Celebrations bundle is one of the new online exclusive products that will be generally available on November 5.

The set is one of those that has lots of bits that can be arranged in any combination that you like. This is enhanced further by the extras in the die set. I really like that the candle and the flames are separate stamps so that you can have any coloured candles. 

The most impressive thing was the beautiful way the cake stand stamped, so that it looks three dimensional.


The card base is Pretty in Pink, chosen to match the very pretty DSP from the Unbounded Beauty collection. I chose the Eyelet 3D embossing folder for the feminine vibe. 

The cake is stamped in Lemon Lolly and Daffodil Delight, the cake stand and flower centres in Early Espresso, the flowers in Pretty in Pink, the leaves in Granny Apple Green and the candles in Flirty Flamingo. It's all assembled on a circle from Stylish Shapes.


The sentiment is also from Cake Celebrations. The words are also mix and match, so I went for a 'Happy' and a 'Birthday' in Early Espresso. The label is from Unbounded Love dies set.


As you see, I went for a very simple fancy fold. I cut 3 cm (about 1 1/4") from the front and added the DSP to the inside panel of the card.

We'd all love to see what you do with Ann's sketch. You can see what the rest of the design team have done, and link up your entry, at The Paper Players page.

Here's a quick recap of our challenge rules:
  1. Create a new paper-craft project specifically for this challenge.
  2. Upload your creation to your blog with a link back to us.
  3. Please provide a direct link to the post featuring your challenge entry.
  4. Please link your card to no more than four challenges, TOTAL, including ours
  5. Have fun, and thank you for playing with us!
Don't forget to check out the great inspiration from the rest of the design team.

Jan Clothier - You are here

If you live in New Zealand and don't have a Stampin' Up Demonstrator, I'd love to be yours. I can help you with ideas, get you catalogues and provide you with Stampin' Up products. You can leave a message in the comments or contact me using any of the methods listed in the Contact Me tab at the top of the page. 

You can shop with me from anywhere in New Zealand here.


Friday 25 October 2024

Thoughtful Wishes for AYSI 335

 The recipe challenge is one of my favourites in the As You See It schedule. Sometimes it's just nice to be given a starting point to create with, then let it roll and see where it goes. This time, our five 'ingredients' are quite opulent - the caviar and lobster of the craft room!


To join in the challenge with us, just create something that included metallics, textured embossing, a 'thinking of you' sentiment, a tag and use warm tones. 

Here's what I came up with.


I chose a square format for a change. I cut one of the tags from the Something Fancy dies in Very Vanilla and a shadow from Mossy Meadow.

I stamped the little flowers stamp  from Thoughtful Wishes in Blackberry Bliss then coloured it with Peach Pie, Pumpkin Pie, Old Olive and Mossy Meadow Stampin' Blends. I added in some splatters in Blackberry Bliss.

After gluing the tags together in the desired position, I added in a bow of Linen Thread, one of my very favourite SU products of all time!

The die cut flowers and foliage were cut with the Thoughtful Wishes dies in Peach Pie, Copper Clay, Mossy Meadow and Blackberry Bliss. The card base is Blackberry Bliss.

The sentiment is  stamped in Blackberry Bliss on Very Vanilla and cut with a die from Everyday Details.


However, the thing I enjoyed playing around with the most was the card front.  I started by embossing a piece of Very Vanilla with the Distressed Tile 3D embossing folder - another favourite of mine. Then I applied some Copper Enamel Effects from the Metallics Enamel Effects Basics, using a dry Water Painter.  I love how this came out, with the richness of the copper picking out the embossed pattern, rather like a Victorian pressed tin ceiling. I'm keen to try this with the gold next time. 

The finishing touch was the addition of three Regal Foiled Dots. I picked Blackberry Bliss ones, each with flecks of gold foil - beautiful!

The team and I would love to see what you can cook up with this selection of deluxe ingredients. Visit the As You See It page to see what the rest of the team have done and to link up your entry. You can join in the challenge until Wednesday November 6, 11.59pm PST.

If you live in New Zealand and don't have a Stampin' Up Demonstrator, I'd love to be yours. I can help you with ideas, get you catalogues and provide you with Stampin' Up products. You can leave a message in the comments or contact me using any of the methods listed in the Contact Me tab at the top of the page. 
You can shop with me from  anywhere in New Zealand here.

Wednesday 23 October 2024

Magnolia Mood for Colour INKspiration 176


Welcome to the 176th challenge at Colour INKspiration. Australia has just the best of birds - isn't this one a real beauty?! Crew member, Lou Kitzelman, said it is an Australian Pink Robin. She's given this to us as the inspiration for the latest challenge. 


If you haven't played with us before, we are a group of Stampin' Up Demonstrators from the South Pacific. Challenges are shown and entered via our Facebook Group page. If you don't belong, and would like to, click here. Don't forget to answer the three easy questions you'll be asked when you ask to join the group.

Each challenge, Top Picks and a winner are chosen by the crew and the winner offered a chance to Guest Design with us for a future challenge. Please welcome our Guest Designer for this challenge, Janette Goodall. 

If you don't have an exact challenge colour, feel free to replace it with whatever you have that's closest, for example Lemon-Lime Twist for Granny Apple Green. Black, White, Very Vanilla, Crumb Cake, Basic Beige and metallics are free colours, as are flesh toned Stampin' Blends.

This challenge is open for three weeks and closes Monday November 11, 7pm AEST.

I loved this bright colour combination - maybe I was just carried away by the beautiful robin! I saw flowers in these colours and I turned to the Magnolia Mood bundle straight away.


I stamped the large flower and cone images in Tuxedo Black, then coloured them with Stampin' Blends in Petunia Pop, Crumb Cake and Granny Apple Green before die cutting them out. 

The front card panel I embossed using the Painted Texture folder and it is attached to a Petunia Pop card base. 


I cut a circle using the Spotlight on Nature dies which I added to one edge of the card front, trimming off the excess at the left hand side. The sentiment is white embossed on Basic Black cardstock, which is cut with one of the Unbounded Love dies.

I added in some Silver & White Sheer ribbon in a bow under the sentiment and finished off with three Petunia Pop Shimmer Gems from the In-Color Shimmer Gem pack.

The most time spent on this card was my havering around over whether to go for a Basic Black card front with a black-on-white sentiment! Otherwise, this is a pretty straightforward card. I think the design lends itself to a whole host of colours. 

We'd love to see what you do with the challenge colours. You can join the group in the following link, if you aren't already a member. Don't forget to answer the questions when you ask to join. You can see what the rest of the Design Team have done with these colours in the Crew Inspiration Album on the Colour INKspiration Challenge Facebook page.

If you live in New Zealand and don't have a Stampin' Up Demonstrator, I'd love to be yours. I can help you with ideas, get you catalogues and provide you with Stampin' Up products. You can leave a message in the comments or contact me using any of the methods listed in the Contact Me tab at the top of the page. 

You can shop with me from anywhere in New Zealand by clicking here


Sunday 20 October 2024

Simply Zinnia for Paper Players 712

Welcome to the latest challenge at The Paper Players! Our hostess this week is the wonderful LeAnne, who has a CAS challenge for us with the theme of 'Tag,  you're it!" Last time we had a CAS Theme challenge, I managed to forget all about the CAS part! I was much better prepared this time!

Before I get to this week's card, I just wanted to mention all the wonderful entries in Joanne's colour challenge last week. I always love to see what everyone comes up with and to visit blogs to see the creations in more detail. 


So, despite my intention to keep this card really Clean And Simple, the tag element made it a little tricky to be really CAS minimalist because the tag automatically added a layer. However, I think I kept to the spirit of CAS which is lots of open space, minimal clutter and minimal embellishment.

I used one of my current favourite stamps, Simply Zinnia. I made a tag using the Elegant Edge Tag Topper Punch, one in Basic White and one in Fresh Freesia. I used the trio of blooms image and stamped in Tuxedo Black onto the tag and coloured it using Stampin' Blends in Fresh Freesia, Highland Heather and Petunia Pop, along with Lemon-Lime Twist and Granny Apple Green for the leaves.


Originally, I was going to black emboss the sentiment at the base of the tag - which I did. But it just didn't stand out enough, so I stamped it then die cut it using one of the banners from Stylish Shapes instead. Designing decisions on the fly!  😀

The sentiment is from Country Birdhouse

I do love texture, so I couldn't help but emboss the card front with the Zinnia embossing folder.  Three Purple Shimmer Gems complete the card. 

We look forward to seeing your romantic creations. You can see what the rest of the design team have done, and link up your entry, at The Paper Players page.

Here's a quick recap of our challenge rules:
  1. Create a new paper-craft project specifically for this challenge.
  2. Upload your creation to your blog with a link back to us.
  3. Please provide a direct link to the post featuring your challenge entry.
  4. Please link your card to no more than four challenges, TOTAL, including ours
  5. Have fun, and thank you for playing with us!
Don't forget to check out the great inspiration from the rest of the design team.

Jan Clothier - You are here

If you live in New Zealand and don't have a Stampin' Up Demonstrator, I'd love to be yours. I can help you with ideas, get you catalogues and provide you with Stampin' Up products. You can leave a message in the comments or contact me using any of the methods listed in the Contact Me tab at the top of the page. 

You can shop with me from anywhere in New Zealand here.


Thursday 17 October 2024

Creativity Abounds October


This month the international team at Creativity Abounds has a great theme for our bundle and hop: Holiday Themed Items from the Mini Catalogue. This hop - and the associated tutorial bundle - will give you a lot of examples for Christmas ideas. Even if you don't have the exact sets, you'll find inspiration in the colour combos, the layouts and even some fancy folds.  If you get the tutorial bundle, you'll have step-by-step instructions for thirteen projects, all of which you'll see as you go around the hop.

You can earn the Tutorial Bundle as a free gift from me with a purchase of $100 or more (excluding P&P) or by being a member of my team. You can shop with me, and join my team, from anywhere in New Zealand.

Since Christmas is mid-summer in the Southern Hemisphere, I really couldn't go past the Surfin' Santa set. What a lovely, fun set this is!


I've made projects with this set for both this hop and the tutorial bundle.


To make this card you will need:

Inks: Tuxedo Black, Shaded Spruce,  Balmy Blue, Versamark
Colouring: Stampin' Blends in Real Red, Balmy Blue, Lemon-Lime Twist, Shaded Spruce, Smoky Slate, Crumb Cake, Ivory and Bronze
Paper: Shaded Spruce, Basic White, Full of Life DSP
Other: Stylish Shapes dies, Tinsel Gems, Wink of Stella, Dimensionals, White Embossing Powder from the Basics Embossing Set, Heat gun, Blending Brush, Paper Snips.

Measurements
Shaded Spruce base: 21cm x 14.5, scored at 10.5cm (8 1/2" x 5 1/2", scored at 4 1/4")
Basic White Mat: 14cm x 10cm (5 1/4" x 4")
Basic White inside: 14cm x 10cm (5 1/4" x 4")
Full of Life DSP: starburst in blues and greens, cut to 13.5cm x 9.5cm (5" x 3 3/4") so that the centre of the starburst is in the centre of the piece.
Basic White for stamping Santa and gifts: 10cm x 6.5cm (4" x 2 3/4")
Basic White for circle and sentiment: 12cm x 8.5cm (4 3/8" x 3 1/2")

Instructions
  1. Fold the Shaded Spruce base on the score line and burnish.
  2. Attach the Basic White mat to the front.
  3. Attach the piece of DSP to the Basic White Mat.
  4. Using Tuxedo Black, stamp Santa and the presents. Colour with Stampin' Blends. Add some Wink of Stella to Santa's sunglasses and drink, then fussy cut them out. 
  5. Rub the other Basic White piece with an embossing buddy then stamp the wave in Versamark. Add white embossing powder and heat. Die cut with the largest stitched circle from Stylish Shapes so that the wave is centre and near the bottom of the circle. Add some Balmy Blue ink with a blending brush. Start blending from the bottom so the colour is deeper near the bottom of the wave.
  6. Stamp the 'Warm Wishes' in Shaded Spruce. Die cut with the smallest stitched square from Stylish Shapes.
  7. You're ready to assemble. Add the wave circle to the centre of the card front. Arrange the Surfin' Santa and the sentiment on the circle. Attach with dimensionals. 
  8. Arrange the parcels, starting with the largest on the surfboard, so it looks as though they're blowing off the back. Attach any off the board with dimensionals.
  9. Add three Lemon-Lime Tinsel Gems.


Here's a peek at the project I've put into the tutorial bundle. Instructions for this card are in the tutorial bundle - along with 12 other holiday themed projects from the rest of our international team.


Here's a Sneak Peek at the whole tutorial bundle.

If you live in New Zealand and don't have a Stampin' Up Demonstrator, I'd love to be yours. I can help you with ideas, get you catalogues and provide you with Stampin' Up products. You can leave a message in the comments or contact me using any of the methods listed in the Contact Me tab at the top of the page. 

You can shop with me from anywhere in New Zealand by clicking here

If you don't live in New Zealand, you can get it from any of my team mates in your country. Here they all are...


Sunday 13 October 2024

Layers of Beauty for Paper Players 711

Doesn't time fly? It's already time for a new challenge at The Paper Players. Thanks to everyone who played along last week with my 'Love is in the Air' challenge. It was a delight to visit all the entries and something of a torment to have to choose only one winner from all the lovely creations! 😀 

This week, our hostess is Joanne and she's choses an autumnal palette for our colour challenge: Shades of orange and brown. 


As much as I love autumn colours, I promised myself that I'd stay away from autumn leaves - just because looking out my window, I'm surrounded by the bright greens of new spring growth!

So that did leave me in something of a dilemma about where to take these colours. I thought that the richness of them was for a special occasion or a special person. Maybe I just still had a romantic hangover from last week's theme challenge but I went with what I'm thinking of as an anniversary card.

As to my colours, I stuck with all the pies: Peach Pie, Pumpkin Pie and Pecan Pie with a cup of coffee - some Early Espresso! Actually, I did do the small flower centres in Crushed Curry - an orange/yellow colour - but it hardly shows! 😂

The Layers of Beauty stamp/die/stencil bundle was my starting point. I stamped the image in Early Espresso then used the five easy-to-layer stencils, with Blending Brushes, to colour. Then I partially die cut the image to create a bottom section of card front.


I embossed a whole card front using the Forever Plaid 3D embossing folder and layered the partial die cut section over the top.


The sentiment is stamped in Early Espresso. Layered beneath it are three die cut pieces of foliage, cut from Basic White and sponged, using a Blending Brush,  with Pecan Pie and Pumpkin Pie to softly colour them to match the flowers. The finishing touches were a trio of Shimmer Gems in Peach Pie around the sentiment.

We look forward to seeing your creations in shades of orange and brown. You can see what the rest of the design team have done, and link up your entry, at The Paper Players page.

Here's a quick recap of our challenge rules:
  1. Create a new paper-craft project specifically for this challenge.
  2. Upload your creation to your blog with a link back to us.
  3. Please provide a direct link to the post featuring your challenge entry.
  4. Please link your card to no more than four challenges, TOTAL, including ours
  5. Have fun, and thank you for playing with us!
Don't forget to check out the great inspiration from the rest of the design team.

Jan Clothier - You are here

If you live in New Zealand and don't have a Stampin' Up Demonstrator, I'd love to be yours. I can help you with ideas, get you catalogues and provide you with Stampin' Up products. You can leave a message in the comments or contact me using any of the methods listed in the Contact Me tab at the top of the page. 

You can shop with me from anywhere in New Zealand here.

Humble Home for Freshly Made Sketches 657

After a lovely family morning at the playground, I got into my craft room this afternoon. Perfect day, right? For inspiration, I used the sketch at Freshly Made Sketches for a simple Christmas card.


I used the Humble Home bundle as a starting point. I'm still trying to make friends with it!

I stamped the gingerbread house image but masked off the gable decoration so I could stamp the tiny wreath into the space instead. I coloured it using Stampin' Blends in Crumb Cake, Granny Apple Green and Cherry Cobbler before punching it out. 

I made the tags using a retired tag topper punch and retired corner rounder punch. Some things you've just got to keep in your craft library! The backing tag is cut from paper in the Take A Bow stack.


To create the diagonal of the sketch, I used the Forever Plaid 3D Embossing folder at an angle. 

Before attaching the house, on dimensionals, I stamped in some stars (or maybe snow) in Granny Apple Green. This little gem of a stamp is from Reindeer Fun. The sentiment is stamped in Garden Green to match the card base and cut with a banner from Stylish Shapes dies.

The embellishments are Basic Rhinestones coloured with a dark Granny Apple Green Stampin' Blend.

This is a straightforward card you could easily reproduce in multiples for your Christmas mail out and with a spot of colouring in, was fun to make.

If you live in New Zealand and don't have a Stampin' Up Demonstrator, I'd love to be yours. I can help you with ideas, get you catalogues and provide you with Stampin' Up products. You can leave a message in the comments or contact me using any of the methods listed in the Contact Me tab at the top of the page. 

You can shop with me from  anywhere in New Zealand here.


Friday 11 October 2024

Layered Florals for AYSI 334

The latest challenge at As You See It is our 'fill in the blank' challenge. Team member Deborah is asking us to think about our favourite crafting item.


Well, that's a bit like asking which is your favourite child! I have many favourite crafting items. But when I really thought it through, one thing that I use almost every time is an EMBOSSING FOLDER. I love texture and will always look to add it to a design. I'm way more likely to use a folder than to use patterned paper. (Speed Challenges excluded!)

Usually I like an embossing folder because they tend to be subtle. They add interest without dominating or crowding the focal point. However, to celebrate the Embossing Folder and to honour my favourite craft item, I created this card and let the folder be the star. ☆

While there are also many interesting techniques you can use with an embossing folder, I've kept it pretty simple. This is because the Layered Florals 3D Embossing folder really isn't a subtle one. The impressions are really deep and therefore stand proud. 

I embossed a piece of Gold Foil, then gently swiped Jet Black Stazon Ink over the top before cutting it into three strips. 


Then I used a second (more subtle) embossing folder - the cross hatch pattern from the Basics 3D Embossing Folder set -  on a piece of Basic Black card. I mounted the three foil strips on it before attaching it to the Basic Black card base. 


The sentiment is from Something Fancy stamped in Tuxedo Black. The white circle is from the Everyday Details die set while the black circle is from Spotlight on Nature.  I like that mixing and matching die sets gives more options. There's a plain Gold Foil circle under the white one so that the gold peeps through. 

The bow is from the retired Elegant Trim combo. If you don't have any of this in your stash, there's a very similar gold cord coming up in next month's new Online Exclusives  you could keep an eye out for. 

Since I had a black/white/gold theme going on, I added three Brushed Brass Butterflies. It only seemed right for the garden of flowers to have butterflies. 😀

The team and I would love to read all about your favourite craft item - items. Visit the As You See It page to see what the rest of the team have done and to link up your entry. You can join in the challenge until Wednesday October 23, 11.59pm PST.

If you live in New Zealand and don't have a Stampin' Up Demonstrator, I'd love to be yours. I can help you with ideas, get you catalogues and provide you with Stampin' Up products. You can leave a message in the comments or contact me using any of the methods listed in the Contact Me tab at the top of the page. 

You can shop with me from  anywhere in New Zealand here.


Wednesday 9 October 2024

Regal Flora for Around the World on Wednesday


Welcome to the latest hop at Around the World on Wednesday!

On the second Wednesday of each month, the team put together a thematic hop to give you some inspiration for your own crafting. We love it when you try out something new or CAS(E) one of our projects. The team is truly international, with members from each time zone of the world that Stampin' Up! operates. You're with me, in New Zealand - the first place in the Stampin' Up! world to change the date. 😀

Our inspiration this month is this lovely sketch. I love a sketch challenge. I find them really great for getting my mojo moving again. So if you're in a bit of a creative slump, why not use this one as your inspiration?


Another source of inspiration for this card is the very lush floral papers in the Regal Winter collection. The colours are rich and gorgeous but for this card, I went with those in shades of Navy and Blackberry.

One of my favourite things in the Regal Flora bundle is that label shape with pie crust detailing and two rounded corners. It's great as a label for greeting but so very useful as a base for building up a cluster too. 


For the embossed card front, I used a favourite folder of mine - Distressed Tile.  I stamped and die cut some flowers and foliage, picking out colours from the DSP. I've used Night of Navy, Berry Burst, Blackberry Bliss and Pretty Peacock. To get variations of colour, I added some of the inks with a sponge dauber. For instance, I inked the trio of flowers with Berry Burst, then used a sponge dauber to add Blackberry Bliss to the centres.


The sentiment is stamped in Night of Navy to match the card base, then cut with the smallest banner from Stylish Shapes. Possibly my favourite thing is the embellishments. These beautiful gold foiled gems are from the Regal Foiled Adhesive Backed Dots: a name that doesn't do justice to the rich colours and flashes of gold!

Next up you can visit with the fabulous Leonie Stuart to see what clever things she's done with the sketch.


If you live in New Zealand and don't have a Stampin' Up Demonstrator, I'd love to be yours. I can help you with ideas, get you catalogues and provide you with Stampin' Up products. You can leave a message in the comments or contact me using any of the methods listed in the Contact Me tab at the top of the page.