Sunday, 13 July 2025

Impressions Abloom for PP746

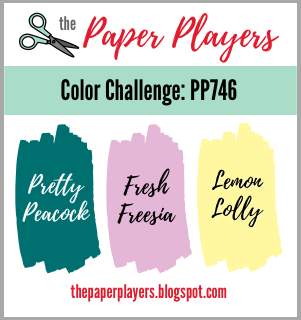
Welcome to a new week at The Paper Players, where Ann is our hostess this week. She has a pretty colour combination to inspire us.  


Of course this colour palette lead me to florals and from there it was a short step to reach for the Impressions Abloom bundle.


I really love the dies that come in this bundle, so I started by cutting a variety of flowers, centres and leaves in Basic White. Then I added colour with a blending brush: Pretty Peacock to the leaves, Lemon Lolly to the centres and Fresh Freesia to the flowers. The smaller flowers were sponged lightly and from the outside towards the centres so the edges were darker. Then I decided I needed some more variation, sot I took to the large flower with a very heavy hand! I certainly got the variation I was after - maybe even more than intended!


I embossed the Basic White card front with the Pressed Flowers embossing folder before arranging the coloured die cuts over it. The card base is Pretty Peacock.


The sentiment, from Impressions Abloom, is stamped in Pretty Peacock and cut with a banner from Stylish Shapes.  I cut a smaller banner in Pretty Peacock to create an accent for the sentiment. The embellishments are from the Pretty Peacock and Petal Pink Foiled Gems, now retired.

What will you do with Ann's pretty colours? You can see what the rest of the team have done and link up your entry on The Paper Players page. 

Here's a quick recap of our challenge rules:
  1. Create a new paper-craft project specifically for this challenge.
  2. Upload your creation to your blog with a link back to us.
  3. Please provide a direct link to the post featuring your challenge entry.
  4. Please link your card to no more than four challenges, TOTAL, including ours
  5. Have fun, and thank you for playing with us!
Don't forget to check out the great inspiration from the rest of the design team.

Anne Marie Hile (on leave)
Jan Clothier - You are here


If you live in New Zealand and don't have a Stampin' Up Demonstrator, I'd love to be yours. I can help you with ideas, get you catalogues and provide you with Stampin' Up products. You can leave a message in the comments or contact me using any of the methods listed in the Contact Me tab at the top of the page. 
You can stamp with me, and shop with me, from anywhere in New Zealand. Click here.


Friday, 11 July 2025

Circles for As You See It 352

 It's fill in the blank week at As You See It Challenge. Joanne has asked us to consider which shape we'd use if we could only use one shape in our projects.


Well, for me it would be circles because they are so versatile. Die cut or punch them for sentiments, use them as a base for a cluster of other elements, use them to create bubbles or zones, circular cards, cut them into halves or quarters to create secondary patterns - the sky is pretty much the limit.

For this challenge, I've gone for the 'cut them up to create secondary patterns' model. If you go hunting around the internet, you'll find lot so examples of this kind of thing. It's really very easy to do and gives quite a striking result depending on the colours and sizes you choose. 

Stuck in the depths of winter as I am, I had some yearning for summer - hence the summery colours I've chosen. I used some retired circle dies to cut 4 sizes, one set in warm colours and one in cool colours. I layered them up then cut each circle in half. Then joined them together again. I don't know why I didn't use my stitched circle dies from Stylish Shapes because that would have given some extra detailing to the design - something for next time!

A nice long linear sentiment is needed to cover the join - and it's true that that is NOT a circle! So when you're making your card for this challenge, remember we're looking for the majority of the shapes to be your chosen shape.


I did actually consider making this card into a circular easel card, which would have been easy enough to do, but I decided instead to make a square card so that I could get the best bang from the Dotted Circles 3D embossing folder. I embossed the card front carefully to get a circular frame to nestle the reconstructed circles into. 

The sentiments were heat embossed in white onto Basic Black. 'You make a difference' is from Thankful Garden and 'You are seriously the best' is from Textured Notes.

And in keeping with the circle theme, many great embellishments are also circles. I've used the wonderful golden patterned circles: Flower Accents.

We'd love to see what your favourite crafting shape is.  You can see what the rest of the team have done, and link up your entry, at the As You See It Challenge page

If you live in New Zealand and don't have a Stampin' Up Demonstrator, I'd love to be yours. I can help you with ideas, get you catalogues and provide you with Stampin' Up products. You can leave a message in the comments or contact me using any of the methods listed in the Contact Me tab at the top of the page. 

You can stamp with me, and shop with me, from anywhere in New Zealand. Click here.

Wednesday, 9 July 2025

Gallery Blooms for Around the World on Wednesday


Welcome to Around the World on Wednesday's July hop.

On the second Wednesday of each month, the team put together a thematic hop to give you some inspiration for your own crafting. We love it when you try out something new or CAS(E) one of our projects. The team is truly international, with members from each time zone of the world that Stampin' Up! operates. You're with me, in New Zealand - the first place in the Stampin' Up! world to change the date. 😀

This month, we're doing something a little different. It's five years since Around the World on Wednesday started up, so we're doing some close-up looks at the team. Aurelie Fabre was a founding member of the team so this month we're all going to CASE one of her projects. 


But our team leader, Angie McKenzie likes to keep us on our toes, so in addition to CASEing Aurelie, we're also using a Tic-Tac-Toe board.


After browsing through Aurelie's blog, I found this card to CASE. So pretty, isn't it?


So armed with this gorgeous design and the centre column of the Tic Tac Toe board (Circle-line-repeat), this is what I came up with....


I used the very pretty floral spray image from Gallery Blooms. I repeat stamped this using Gray Granite ink then coloured each repeat using Fresh Freesia, Old Olive and Daffodil Delight Stampin' Blends. I die cut them out.
 

Aurelie's original card had a soft splatter of colour behind her repeated daffodils. I added in some soft splatter in Daffodil Delight but also some lines of text. Both the splatter and lines of text come from a set that I'm finding indispensable: Elements of Text.

After completing the background stamping on the card front, I arranged the die cut blooms over it, then trimmed off any overhang before attaching the card front to the Gray Granite card base.

I replaced Aurelie's sentiment label with a stitched circle from Stylish Shapes. The sentiment, stamped in Gray Granite, is from Beautiful Motifs - a sentiment only companion set to Gallery Blooms.

As beautiful as the Brushed Brass Butterflies from Aurelie's original are, I replaced them with some Antique Pearls for a more vintage feel. 

Keep on hopping to see how the rest of the team have CASEd Aurelie.  Next up is the wonderful Leonie Stuart from Australia. I'm sure she has a treat to share with us!


If you live in New Zealand and don't have a Stampin' Up Demonstrator, I'd love to be yours. I can help you with ideas, get you catalogues and provide you with Stampin' Up products. You can leave a message in the comments or contact me using any of the methods listed in the Contact Me tab at the top of the page. 

You can shop with me from anywhere in New Zealand here.


Here's a blog roll of participants in case you get lost or want to revisit someone.


Prairie Grass for Colour INKspiration 191


Welcome to the 191st challenge at Colour INKspiration. This challenge runs for nearly two weeks and will finish on Monday July 21, 7pm AEST.

This colour palette was chosen for us by Crew Member, Nicole Wilson. It's a timely palette for the Southern Hemisphere with the Aurora Australis having shown itself many times in the last few months - although sadly, I've never seen it live.


If you haven't played with us before, we are a group of Stampin' Up Demonstrators from the South Pacific. Challenges are shown and entered via our Facebook Group page. If you don't belong, and would like to, click here. Don't forget to answer the three easy questions you'll be asked when you ask to join the group.

Each challenge, Top Picks and a winner are chosen by the crew and the winner offered a chance to Guest Design with us for a future challenge. We welcome Kisha Cook as our Guest Designer for this challenge.

If you don't have an exact challenge colour, feel free to replace it with whatever you have that's closest, for example Melon Mambo for Berry Burst. Black, White, Very Vanilla, Crumb Cake, Basic Beige and metallics are free colours, as are flesh-toned Stampin' Blends.

I'm currently enjoying playing with one of the new Online Exclusive stamp sets, Prairie Grass. It's one of those sets that I didn't need - but certainly wanted - and now I have it, it's becoming addictive!

The set lends itself to silhouette stamping, so the colours themselves were perfect for a Southern Lights-style blended background.


I masked off a column of card front and blended in Lemon-Lime Twist, Granny Apple Green, Berry Burst and Blackberry Bliss inks with blending brushes.

After removing the mask, I stamped the grasses over the top using Tuxedo Black ink. Then I cut the piece down using one of the Textured Notes dies to create the decorative edge. I matted this to a piece of  Lemon-Lime Twist cardstock, then attached to the Blackberry Bliss card base. 

The sentiment, from the Prairie Grass set was stamped in Tuxedo Black and cut with one of the Stylish Shapes banner dies. I cut a smaller banner in Blackberry Bliss and tucked it in behind the sentiment to accent it. 

The finishing touch was the addition of some Blackberry Bliss Shimmer Gems

You can see what the rest of the Design Team have done with these colours in the Crew Inspiration Album on the Colour INKspiration Challenge Facebook page.

If you live in New Zealand and don't have a Stampin' Up Demonstrator, I'd love to be yours. I can help you with ideas, get you catalogues and provide you with Stampin' Up products. You can leave a message in the comments or contact me using any of the methods listed in the Contact Me tab at the top of the page. 

You can stamp with me, and shop with me, from anywhere in New Zealand. Click here.


Sunday, 6 July 2025

Prairie Grass for Paper Players

We had such wonderful entries in Jaydee's Tic-Tac-Toe last week, I'm looking forward to seeing everyone's creativity this week. Our hostess this week at The Paper Players is Stef. She has a theme challenge for us: Round We Go! Feature Circles on your card. Interesting, right? 


As it happens, I'm very fond of circles and often use them in my work. Today I've used them to create a background for a new stamp from Online Exclusives, Prairie Grass

To start off with, I created some circle masks from some scraps of window sheet. I used four different punches to create the masks. The exact sizes are not really important. I was looking for a good range of sizes to play around with.  From memory, the smallest was a 1/2" punch and the largest 1 3/4" to give you an idea but I could equally have used circle dies to cut them.


Then I used  Azure Afternoon and Lemon-Lime Twist inks and used Blending Brushes to apply colour through the mask. I started with the largest circle at the bottom, added in the next largest circle twice, then placed the smaller two around them until I was happy with the composition. Fair to say, this is part of the process where there's some trial and error to get a pleasing layout. I used varying intensities of the colour to add variation too. 


Using Tuxedo Black, I inked up some of the grass images and stamped them over the circles. I think another time I'd try out black embossing to see how that looks.

The sentiment, from The Right Words is stamped in Tuxedo Back onto Lemon-Lime Twist and cut using my favourite banner die from Stylish Shapes. The Right Words is rapidly becoming my go-to sentiment only set because of the range of occasions covered, the variety of font styles and the two-part greetings. 

To finish of my circle-theme, I added in some Black dots from the Neutral Matte Dots to tie in with the black twine from the Basic Essentials pack.

I like this layout and I think it would work with many colour combinations especially a sunrise or sunset colourway.

You can see what the rest of the design team have done, and link up your entry, at The Paper Players page.

Here's a quick recap of our challenge rules:
  1. Create a new paper-craft project specifically for this challenge.
  2. Upload your creation to your blog with a link back to us.
  3. Please provide a direct link to the post featuring your challenge entry.
  4. Please link your card to no more than four challenges, TOTAL, including ours
  5. Have fun, and thank you for playing with us!
Don't forget to check out the great inspiration from the rest of the design team.

Anne Marie Hile (on leave)
Jan Clothier - You are here


If you live in New Zealand and don't have a Stampin' Up Demonstrator, I'd love to be yours. I can help you with ideas, get you catalogues and provide you with Stampin' Up products. You can leave a message in the comments or contact me using any of the methods listed in the Contact Me tab at the top of the page. 
You can stamp with me, and shop with me, from anywhere in New Zealand. Click here.


Wednesday, 2 July 2025

Perfectly Pears for Atlantic Hearts Challenge 636

Doing well this week on my playing 'just for fun' resolution! Today, I'm joining in with Atlantic Hearts Sketch Challenge.


I love a sketch challenge and this one was begging me to use the new Painterly Pears suite, just released in the Online Exclusives section of my store. 

I'm loving the beautiful images of fruit and flowers, the rich colours and the vintage feel of the stamps, dies and DSP. Of course, there are gorgeous embellishments too: a Mossy Meadow and Gold ribbon and pretty dots. 

This card came together pretty quickly, especially as I played the sketch in a straightforward interpretation. Three strips of Painterly Pears DSP with the ends carefully torn attached to a Basic White card front, embossed with the Exposed Brick 3D embossing folder

I cut a circle with one of the Spotlight on Nature dies and stamped the sentiment in Secret Sea before attaching it to the strips of DSP.


The pears were stamped in Old Olive and Darling Duckling then die cut. I added a die cut stem in Old Olive as well as some fruit blossoms. They were stamped in Secret Sea with Darling Duckling centres then die cut.

These bits and pieces were arranged on the circle, around the sentiment. Some were popped up to add dimension. The final touch was a trio of low profile Sparkle Dots in Secret Sea.  All done!

If you live in New Zealand and don't have a Stampin' Up Demonstrator, I'd love to be yours. I can help you with ideas, get you catalogues and provide you with Stampin' Up products. You can leave a message in the comments or contact me using any of the methods listed in the Contact Me tab at the top of the page. 

You can stamp with me, and shop with me, from anywhere in New Zealand. Click here.


Sunday, 29 June 2025

Gallery Blooms for Paper Players 744

Wasn't Elizabeth's one-layer challenge both a bit daunting and a lot of fun? We got such creative entries, I can't wait to see what you do with this Tic-Tac-Toe Challenge from Jaydee.


I do like a TTT challenge and for this one, I've used the first column as inspiration: CAS, Flowers, Postal Element. 

I've been playing around with Gallery Blooms quite a bit lately, mainly because I really love the big spray of flowers in the set. I started by stamping it in Tuxedo Black onto my white card front. I coloured it using Petunia Pop, Daffodil Delight and Shy Shamrock Stampin' Blends.


I used a sentiment from The Right Words, a sentiment only set that is proving to be invaluable. Not only does is have a group of really useful sentiments in a variety of fonts, each sentiment come in two parts so you have the option of using a related sentiment on the inside of your card. 


Then it was time to employ the postal element of the grid: Perennial Postage dies. I cut out a postage stamp from the centre of the blooms. Then I popped it back into place using dimensionals - which means that I also employed the Eclipse Technique. 😀

I used Iridescent Pearls as embellishments.

As I worked, I wondered what it would look like on a coloured base, so I did the same thing again (almost) by using a Petunia Pop base. The birthday sentiment is also from The Right Words and I used some Shy Shamrock embellishments to finish off. 


Which line of the Tic-Tac-Toe will you choose as inspiration?


You can see what the rest of the design team have done, and link up your entry, at The Paper Players page.

Here's a quick recap of our challenge rules:
  1. Create a new paper-craft project specifically for this challenge.
  2. Upload your creation to your blog with a link back to us.
  3. Please provide a direct link to the post featuring your challenge entry.
  4. Please link your card to no more than four challenges, TOTAL, including ours
  5. Have fun, and thank you for playing with us!
Don't forget to check out the great inspiration from the rest of the design team.

Anne Marie Hile (on leave)
Jan Clothier - You are here


If you live in New Zealand and don't have a Stampin' Up Demonstrator, I'd love to be yours. I can help you with ideas, get you catalogues and provide you with Stampin' Up products. You can leave a message in the comments or contact me using any of the methods listed in the Contact Me tab at the top of the page. 
You can stamp with me, and shop with me, from anywhere in New Zealand. Click here.


Friday, 27 June 2025

Thankful Garden for As You See It 351

 It's time for a colour challenge at As You See It this week. Don't forget that the Featured Artist in this week's gallery will be offered the opportunity to Guest Design with us in our next Recipe Challenge. That's a fun way to put your toe in the water of being on a team if you've not done it before. 

With that gorgeous floral graphic and the sunny colours, it was hard to go past florals for this challenge. My go-to florals at the moment (by a narrow squeak) is the Thankful Garden bundle. I love the stamps and dies with the extra bits but the addition of a layered set of stencils gives even more otpions. You'll find this set in the Online Exclusives section of the store. 

With such impactful colours and a large striking floral image, this card didn't need much else. I started by stamping the large image and using the layered stencils, and blending brushes, to colour it. I used a sponge dauber to colour the centre of the bloom in Peach Pie. Once the colouring was complete, I die cut the image. 


I used the Forever Plaid 3D embossing folder to give the card front some texture. The sentiment was stamped in Basic Black and cut using one of the Textured Notes dies. I cut a shadow die from Peach Pie to underline the sentiment.  The card base is Melon Mambo.


To finish off, I used a trio of Peach Pie Resin dots.

The whole team would love to see how you see these bright colours.  You can see what the rest of the team have done, and link up your entry, at the As You See It Challenge page

If you live in New Zealand and don't have a Stampin' Up Demonstrator, I'd love to be yours. I can help you with ideas, get you catalogues and provide you with Stampin' Up products. You can leave a message in the comments or contact me using any of the methods listed in the Contact Me tab at the top of the page. 

You can stamp with me, and shop with me, from anywhere in New Zealand. Click here.