Showing posts with label Harvest Meadow. Show all posts

Friday, 28 January 2022

Nature's Harvest for As You See It 267

The last fortnight has raced by and it's already time for a new challenge at As You See It. As always, the sketch challenge is followed by a colour challenge and isn't it a pretty one?


The trouble with having lots of lovely new things from a newly released catalogue is that some of the gorgeous older things get pushed aside. Nature's Harvest was just too pretty to let that happen to! And I'm still in love with the Timeworn Type 3D embossing folder. It was great to have them both out again.


I used Stampin' Blends to colour the flowers, mixing both greens into the stem and saving the Calypso Coral and Crumb Cake for the flowers.


The sentiment is from Best Year. One of the great things about sentiment only sets like that one is how they can extend the value of all your other image sets by multiplying the options. 

You can see how I put it together and get the tips in this video from my Thinking Stamping You Tube Channel.


You can see what the rest of the Design Team have done with this colour combo and link up your own entry at the As You See It Challenge site.

If you live in New Zealand and don't have a Stampin' Up Demonstrator, I'd love to be yours. I can help you with ideas, get you catalogues and provide you with Stampin' Up products. You can leave a message in the comments or contact me using any of the methods listed in the Contact Me tab at the top of the page. You can shop with me from anywhere in New Zealand by clicking on the SHOP NOW button in the sidebar or on any of the products below.

Product List

Friday, 20 August 2021

Nature's Harvest for AYSI 257

It's recipe week this week at As You See It Challenge. Easy - make us a creation that uses all five of the recipe ingredients. This time round it's: wheat/grass, an embossing folder, twine, gingham and Crumb Cake. 


This challenge (mostly) played right into my hands. I've been busy exploring the Nature's Harvest bundle that includes Nature's Harvest stamp set and matching dies, Timeworn Type 3D embossing folder and Harvest Meadow DSP - among other items. If you haven't already, check out this suite in the July-December Mini Catalogue. If you live in New Zealand and don't have one, message me.

I started with a Crumb Cake base. One of the colours used in the Harvest Meadow DSP is Crumb Cake and by a happy coincidence, there's one that uses Crumb Cake AND wheat sheaves. I die cut the grass die from Cajun Craze and popped it in behind the stamped, coloured and die cut wild flowers.


The background embossing folder is the Timeworn Type 3D folder, which I'm in love with. 

The part of the recipe which caused me some big problems was the gingham element. There are a number of stacks of DSP which include some pretty gingham - and I don't have a single one of them! 😀

Luckily, I spotted this Just Jade Gingham ribbon in my ribbon drawer. It's part of the Flowers for Every Season Ribbon combo. So I coloured the flower stems in Just Jade so there'd be some more coordination. Then a swoosh of twine around it helps highlight the sentiment. I used the label die from the Nature's Harvest bundle (cut down to size) but the sentiment is from Art Gallery.

So, that's it. All five elements included!

We'd love to see what you do with these ingredients. It'll be just like a Masterchef Mystery Box challenge!

You can see what the rest of the team have done and link up your entry at the As You See It Challenge site.

If you live in New Zealand and don't have a Stampin' Up Demonstrator, I'd love to be yours. I can help you with ideas, get you catalogues and provide you with Stampin' Up products. You can leave a message in the comments or contact me using any of the methods listed in the Contact Me tab at the top of the page. You can shop with me from anywhere in New Zealand by clicking on the SHOP NOW button in the sidebar or clicking on any of products below.

Product List

Wednesday, 11 August 2021

Let's Shake it Up for Around The World on Wednesday


Welcome to this month's Around the World on Wednesday blog hop. If you've not visited us before, we hop on the second Wednesday of every month with a theme to inspire you. It's 'around the world' because we represent each time zone that Stampin' Up! operates in: from New Zealand (me) all the way around to Hawaii. 

Our theme for this month is 'Let's Shake it Up'. While that could be seen as making a shaker card, the team have taken it be let's shake up what we do and try something new. 

If you've followed me for a while, you might have realised that I've seldom shown you fancy folds or projects heavy on DSP. That's because I'm much more of a texture over patterns person. Mixing DSP patterns terrifies me! 

As to fancy folds - well, I'm pretty fussy. They have to be easy to make. They have to stand up by themselves. They have to be easy for the recipient to understand and display. Having said that, my daughter made me an Arrowhead fold card a couple of years ago and I loved it. It also intimidated me and fascinated me. Time shake things up and embrace this fold! And I'll take on DSP while I'm at it!

So, it turned out that the Arrowhead fold is not actually difficult at all, while looking fiendishly difficult. To make this, I read/watched a few different tutorials but it comes down to two simple scores lines and two simple measurements.
1. Cut a card base 29cm x 10.5cm (I cut the A4 card short to make the maths easier but you don't have to.)
2. Score the card base at 14.5 cm to make a tent fold base.
3. Make a pencil mark half way along the bottom. (i.e. at 5.25cm)
4. Make a pencil mark half way up each of the sides (i.e. at 7.25cm)
5. Score from the centre bottom to the centre sides. 
6. Now score from the centre bottom to each of the top corners of the card front. 
7. Fold and burnish the centre-bottom to top-corner folds inwards then fold the mid-bottom to mid-side scores  outwards. Glue or tape the folds to the card front so they don't unfold. 
8. Take a piece of DSP 14cm x 10cm. Mark half way across the short side (5cm) and cut from there to the top corners to make 3 triangles. Then choose which of the sides will go on the arrowhead and which side will be showing on the card base. 
DONE!

Of course, the co-ordinating nature of Stampin' Up! DSP means that really no-one should be scared of mixing and matching different patterns. Certainly the wonderful new Harvest Meadow DSP is both gorgeous and easy to use.


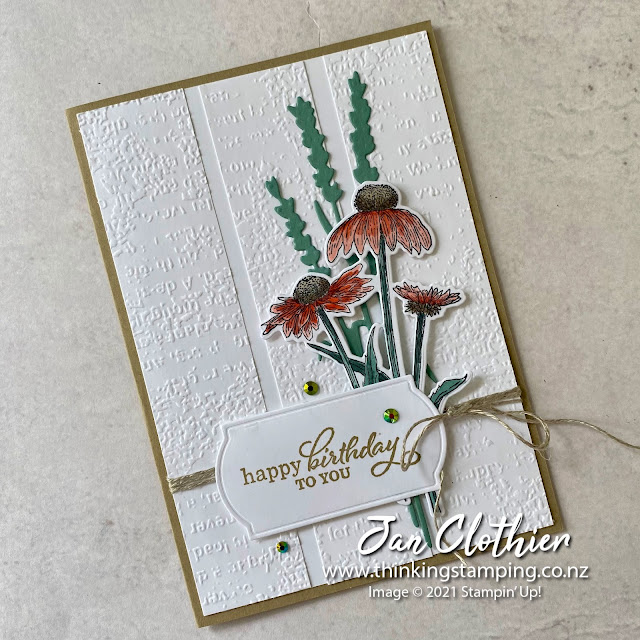
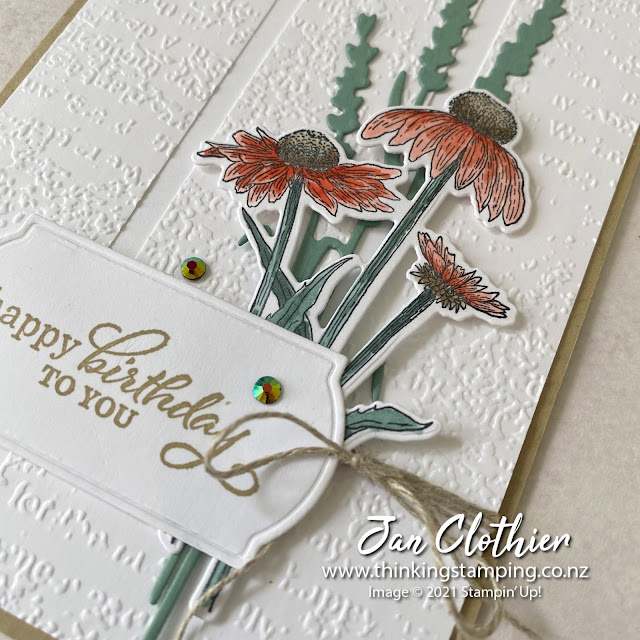
To decorate the arrowhead panel, I used the Nature's Harvest bundle, which is my favourite from the July-December Mini Catalogue. The flowers were stamped in Tuxedo Black and coloured with Stampin' Blends. The wheat die cut is in Cajun Craze. The finishing touches come from the addition of three of the fabulous Brushed Metallic Adhesive Backed Dots.


You can carry on around the hop by visiting the extremely talented Leonie Stuart in Australia.


In case you get lost along the hop here's a list of the hop participants with links. 

Jan Clothier - NZ --- You are here

Leonie Stuart - AU

Rochelle Laird-Smith - AU

Cheryll Miller - AU

Danielle Kassing - NL

Aurélie Fabre - FR

Mikaela Titheridge - UK

Annette Ball - CA

Angie McKenzie - US

Wendy Lee - US

Shel Anderson - CA

Chris Smith - US

Brenda Nelson - CA

Tricia Butts - US

Elaine de Montmorency - CA

Sharon Hashimoto Burkert - US

Teri West - US

Cheryl Hamilton - US


If you live in New Zealand and don't have a Stampin' Up Demonstrator, I'd love to be yours. I can help you with ideas, get you catalogues and provide you with Stampin' Up products. You can leave a message in the comments or contact me using any of the methods listed in the Contact Me tab at the top of the page. You can shop with me from anywhere in New Zealand by clicking on the SHOP NOW button in the sidebar or clicking on any of products below.


Product List