Showing posts with label Stamparatus techniques. Show all posts

Thursday, 11 April 2019

Swaps for OnStage Auckland

Today was the first day of OnStage Auckland. It's so exciting to be at the big three-day event, rather than on OnStage Local. So exciting, that I made swaps for this one! And along the way, I found a new use for my Stamparatus.

Because I was making a lot, I kept things simple. Sponging is one of my favourite techniques, so I updated an old card with new product. I used the leaves from Rooted in Nature, the butterfly from Butterfly Gala and the sentiment from Itty Bitty Greetings. I've previously made it in Night of Navy and Melon Mambo using Kinda Eclectic, Papillon Potpourri and Endless Birthday Wishes. This design is very easy to update and to make an 'any occasion' card by simply choosing a different sentiment from Itty Bitty Greetings. If I was using this in a class, I'd let my people choose their own.


I chose Rich Razzleberry and Old Olive as my base colours just because I like them. I've added Crushed Curry in the sponging but again, this design will work in any colour combination.

Some of the butterflies I coloured with Stampin' Blends and some I sponged with a dauber. Choose the colouring method that suits you and your group.


I found a new way to use Stamparatus in the making of this card. Always for me the finicky part of sponging is lining up the mask over the card front in just the right place and in making sure that there is no card front accidentally left exposed to get an unwanted swish of colour.

Because Stamparatus hold everything so firmly, it's perfect for positioning masks.


1. Put your card front into the Stamparatus, place the mask over the top and use the magnets to hold it all together. The mask and card front are the same size - so no mix up on where to position the circle and no bits hanging out to get accidentally coloured. NB - The broken magnet worked out really well in holding the small corner. 😀


2. Sponge on the colour


3. Stamp the sentiment using the hinge plate.


4. Voila - done!


Add in the leaf stamp.
Because I was using the leaf stamp twice, I stamped them in afterwards but if it had been a single stamp, I could have set it up on the second hinge plate.

Product List

Sunday, 15 July 2018

The Paper Players 401 - Design Team Card

What an amazing two weeks it's been at The Paper Players! So many of you joined in with our 400th Challenge Celebration and the gallery was chock full of the most delightful cards. I could have chosen a dozen winners quite easily. So a hearty congratulations to our winners last week. Be sure to come back on 18 July to see who was randomly selected to receive the prizes. Good luck, everyone!

So, back to real life! This week, it's Joanne's colour challenge and she's chosen three brand new colours from Stampin' Up. It doesn't matter if you don't have the exact SU colour as long as you use similar colours. 


This colour combination got me thinking of florals so it seemed a good chance to try out something I'd been wanting to do for a while - use the Stamparatus to stamp a wreath. Since this is a technique that seems to work well with small stamps I turned to Beautiful Bouquet

I don't know what it is about that set but it sends me over the top everytime. I pull it out and every CAS bone in my body goes into hiding! I don't usually use much red but Lovely Lipstick, one of this year's in-colours, has really grown on me so in the spirit of over-the-topness out came the DSP as well. These little 15 x15 cm pads of DSP in colour families sit quietly in the catalogue, without any fanfare, but are actually incredibly useful.

I made a z-fold card with a circular front and with a matching circular piece hiding in behind it.


Opened out, it looks like this.


We'd love to see what you do with Joanne's colours. Pop over the The Paper Players and see what the rest of the team have done with them, then join in with us.

Here's a reminder of the few rules we have.
  1. Create a new paper project.
  2. Upload your project to your blog with a link back to The Paper Players.
  3. Provide a direct link to your blog post for your challenge entry.
  4. Please link your card to no more than FOUR challenges (including ours).
  5. Enjoy!
If you live anywhere in New Zealand and don't have a Stampin' Up demonstrator, I'd love to help you with ideas and Stampin' Up products. Please message me through my Facebook page, linked in the sidebar of this blog or leave a comment below. 

And, of course, you can shop with me from anywhere in New Zealand by clicking the SHOP NOW button in the sidebar of this blog or by clicking any of the products pictured below.


Product List

Friday, 6 July 2018

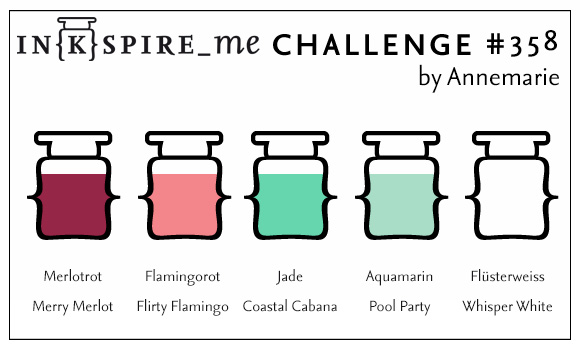
JAI 416 Inkspire 358


Just before I went on holiday last month, I had a box of Stampin' Up supplies arrive. Today, I've enjoyed having a play around with one of those items -  the A Big Thank You bundle. It has a set of stamps and a beautiful, big die cut 'Thank You'.

There's nothing like a challenge to help you focus playing around with things, so inspiration for this card came from two sources: a sketch at Just Add Ink and a bright colour combination at Inkspire Me.


It's a simple card, with a three lines of stamping and the stacked die cut over the top. Stamp-a-ratus makes this kind of stamping so much easier than it used to be!


In this photo, you can see the ombre effect of a line of Pool Party topped with a line of Coastal Cabana. The Merry Merlot words have a slightly offset layer of Pool Party on the bottom to give a shadowing effect.


Product List