Showing posts with label Fancy fold card. Show all posts

Thursday, 20 February 2025

Creativity Abounds February 2025


This month the international team at Creativity Abounds has a great theme for our bundle and hop: Fun Folds. This hop - and the associated tutorial bundle - is always popular and will give you a lot of examples for fancy folds 

Even if you don't have the exact sets, you'll find inspiration in the different folds each of us have used.  If you get the tutorial bundle, you'll have step-by-step instructions for thirteen projects, all of which you'll see as you go around the hop.

You can earn the Tutorial Bundle as a free gift from me with a purchase of $100 or more (excluding P&P) or by being a member of my team. You can shop with me, and join my team, from anywhere in New Zealand.

There are two parts to this post: a bonus project and a sneak peek at my tutorial project.

1. Bonus Project Teepee Fold

The fold I'm showcasing is one I haven't used for some years, the TeePee Fold. Once I got it out and started playing with it, I don't know why I haven't been using it more! It was an excellent chance to explore the Darling Dinos bundle, a current favourite of mine. 

The triangular shaped card stands by itself and can be made so that it folds neatly into a standard envelope. It has three faces that can be decorated, or you can - as I have - leave one relatively blank to write a message on. 

Here's a look at each of the three faces.


2. Tutorial Project Teepee Fold

Here's a glimpse at the card I've created for the tutorial bundle. Same fold, different bundle. I've used the Beautiful Butterflies bundle for this one. Step-by-step instructions are in the tutorial package, along with 12 other projects from the rest of the Creativity Abounds team.


Here's a glimpse at the other twelve projects in the tutorial package. Take the hop around the rest of the team and you'll see exactly which Fancy Folds are being showcased.


If you live in New Zealand, you can get this tutorial bundle free with a qualifying purchase from me. If you live somewhere else, you can get the bundle from a team member in your country. 
Here's who we all are and where we're from.


If you live in New Zealand and don't have a Stampin' Up Demonstrator, I'd love to be yours. I can help you with ideas, get you catalogues and provide you with Stampin' Up products. You can leave a message in the comments or contact me using any of the methods listed in the Contact Me tab at the top of the page. 

You can shop with me from anywhere in New Zealand by clicking here

Sunday, 27 October 2024

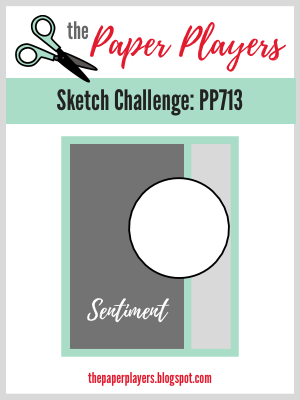
Cake Celebrations for Paper Players 713

Time for a new challenge at The Paper Players! This time our hostess is Ann and she has a sketch challenge for us. 


Sketch challenges are my favourites. This time, I used it unashamedly to try out a new set that arrived during the week. The Cake Celebrations bundle is one of the new online exclusive products that will be generally available on November 5.

The set is one of those that has lots of bits that can be arranged in any combination that you like. This is enhanced further by the extras in the die set. I really like that the candle and the flames are separate stamps so that you can have any coloured candles. 

The most impressive thing was the beautiful way the cake stand stamped, so that it looks three dimensional.


The card base is Pretty in Pink, chosen to match the very pretty DSP from the Unbounded Beauty collection. I chose the Eyelet 3D embossing folder for the feminine vibe. 

The cake is stamped in Lemon Lolly and Daffodil Delight, the cake stand and flower centres in Early Espresso, the flowers in Pretty in Pink, the leaves in Granny Apple Green and the candles in Flirty Flamingo. It's all assembled on a circle from Stylish Shapes.


The sentiment is also from Cake Celebrations. The words are also mix and match, so I went for a 'Happy' and a 'Birthday' in Early Espresso. The label is from Unbounded Love dies set.


As you see, I went for a very simple fancy fold. I cut 3 cm (about 1 1/4") from the front and added the DSP to the inside panel of the card.

We'd all love to see what you do with Ann's sketch. You can see what the rest of the design team have done, and link up your entry, at The Paper Players page.

Here's a quick recap of our challenge rules:
  1. Create a new paper-craft project specifically for this challenge.
  2. Upload your creation to your blog with a link back to us.
  3. Please provide a direct link to the post featuring your challenge entry.
  4. Please link your card to no more than four challenges, TOTAL, including ours
  5. Have fun, and thank you for playing with us!
Don't forget to check out the great inspiration from the rest of the design team.

Jan Clothier - You are here

If you live in New Zealand and don't have a Stampin' Up Demonstrator, I'd love to be yours. I can help you with ideas, get you catalogues and provide you with Stampin' Up products. You can leave a message in the comments or contact me using any of the methods listed in the Contact Me tab at the top of the page. 

You can shop with me from anywhere in New Zealand here.


Sunday, 6 October 2024

Lifetime of Love for The Paper Players 710

Hello Stampers! It's my turn to host at The Paper Players and the theme I've chosen is 'Love is in the Air'. I think it was the fast approach of summer and wedding season that got me thinking of it but if you want to play along with us, think anything romantic: wedding, engagement, anniversary, a love note - even Valentine's if you want to be really organised!


It might not even have been the approach of summer that got me thinking on this theme. In more likelihood, it was the near un-used Lifetime of Love stamps and dies sitting on my desk, looking at me reproachfully! I got this set because I wanted a set of good romantic sentiments in my stash - plus the dies were so pretty! 

I also tried out a (new to me) fancy fold that's been doing the rounds on the Internet of late. I liked it so much that I've used it for some Christmas cards and now, this wedding/anniversary card. 


It looks pretty closed up too. 

The DSP is from the Unbounded Beauty 12x12  DSP collection. Isn't it dreamily pretty? 

I stamped the images in Tuxedo Black then coloured them with Pretty in Pink Blends and Shy Shamrock Blends. For extra interest, I stamped an extra set of the three flower image, then coloured and fussy cut the large centre bloom before popping it up on dimensionals in the wreath.

I cut two wreaths from Shy Shamrock and overlaid them, then added in some glimmery leaves from the 2024-26 In Color Glimmer Paper pack.


The final touch was a trio of In Color Shimmer Gems in Pretty in Pink. 

We look forward to seeing your romantic creations. You can see what the rest of the design team have done, and link up your entry, at The Paper Players page.

Here's a quick recap of our challenge rules:
  1. Create a new paper-craft project specifically for this challenge.
  2. Upload your creation to your blog with a link back to us.
  3. Please provide a direct link to the post featuring your challenge entry.
  4. Please link your card to no more than four challenges, TOTAL, including ours
  5. Have fun, and thank you for playing with us!
Don't forget to check out the great inspiration from the rest of the design team.

Jan Clothier - You are here

If you live in New Zealand and don't have a Stampin' Up Demonstrator, I'd love to be yours. I can help you with ideas, get you catalogues and provide you with Stampin' Up products. You can leave a message in the comments or contact me using any of the methods listed in the Contact Me tab at the top of the page. 

You can shop with me from anywhere in New Zealand here.


Thursday, 22 August 2024

Creativity Abounds Fancy Folds


This month the international team at Creativity Abounds has a great theme for our bundle and hop: Fancy Folds. This hop - and the associated tutorial bundle - will give you a lot of examples of different fancy folds. If you get the tutorial bundle, you'll have step-by-step instructions for all of the ones you see in this hop.

You can earn the Tutorial Bundle as a free gift from me with a purchase of $100 or more (excluding P&P) or by being a member of my team. 

I really like the Arrowhead fold. It looks nice closed up like this but is even better when opened up. 


I like that stylish point at the front of the card while the triangular front is just a bit different from normal. Best of all, despite looking fiendishly difficult to achieve, it's actually straight forward to do.


For this card, I've used papers from Perennial Lavender DSP and some die cuts from Painted Lavender. The sentiment (and label) are from the Unbounded Love bundle. I've finished off with a few Purple Fine Shimmer Gems.

Here's a peek at the project I've put into the tutorial bundle. Despite different papers and stamps,  both use the same method to create the base fold. Instructions for the fold, and this card, are in the tutorial bundle - along with 12 other fancy fold projects from the rest of our international team.


You can get the Fancy Fold Tutorial Bundle from me by making a purchase of $100 or more (before shipping) or by being a member of my team. 

If you live in New Zealand and don't have a Stampin' Up Demonstrator, I'd love to be yours. I can help you with ideas, get you catalogues and provide you with Stampin' Up products. You can leave a message in the comments or contact me using any of the methods listed in the Contact Me tab at the top of the page. 

You can shop with me from anywhere in New Zealand by clicking here

If you don't live in New Zealand, you can get it from any of my team mates in your country. Here they all are...


Here's a sneak peek of the whole bundle.


Don't forget that our next Virtual Stamp Camp is being held in October and will have a Christmas Theme. It will feature the Reindeer Fun bundle, Reindeer Days DSP, Forever Plaid embossing folder, Red and White Baker's Twine and Adhesive Peppermint Dots.


Here's the links to the rest of the hop so you can see what other fancy folds are included in the tutorial bundle.


Wednesday, 10 July 2024

Country Birdhouse for Colour INKspiration 169


Welcome to the 169th challenge at Colour INKspiration! We have a bluesy mix for you to play with this time around, chosen by Crew Member Cathy Pinchbeck.


If you haven't played with us before, we are a group of Stampin' Up Demonstrators from the South Pacific. Challenges are shown and entered via our Facebook Group page. If you don't belong, and would like to, click here. Don't forget to answer the three easy questions you'll be asked when you ask to join the group.

Each challenge, Top Picks and a winner are chosen by the crew and the winner offered a chance to Guest Design with us for a future challenge. We're delighted to welcome Patricia Leferink as our Guest for this challenge.

This challenge is open for nearly two weeks and closes Monday July 22, 7pm AEST.

If you don't have an exact challenge colour, feel free to replace it with whatever you have that's closest, for example Boho Blue for Misty Moonlight. Black, White, Very Vanilla, Crumb Cake, Basic Beige and metallics are free colours, as are flesh toned Stampin' Blends.

These colours had to sit with me for a few days before they started talking to me. It was the Basic Beige that did it. I thought about it with a wood grain and that lead me to Country Birdhouse. I used the Timber 3D Embossing Folder to add the texture. At times, I wished for a green to add in but in the end, I loved how it turned out in stylish shades of blue and beige.

I also wanted to try out a fancy fold I'd seen around on the Internet in quite a few places: a faux step card. A simple internet search will give many tutorials for this fold.


I did a mirror stamp to get one bird facing each way - it just seemed more companionable that way! I'm pleased with their Misty Moonlight chests too. 

It was a small error to use the same pattern of DSP in both Night of Navy  (card) and Misty Moonlight (the Birdhouse) as it doesn't really show a difference, at least in the photo. I used the 2024-26 In Colour 6x6 DSP pack for the papers.

The sentiment from the set is stamped in Night of Navy and is die cut with the Stylish Shapes dies.


I'm excited to see what you do with these pretty colours!

You can see what the rest of the Design Team have done with these colours in the Crew Inspiration Album on the Colour INKspiration Challenge Facebook page.

If you live in New Zealand and don't have a Stampin' Up Demonstrator, I'd love to be yours. I can help you with ideas, get you catalogues and provide you with Stampin' Up products. You can leave a message in the comments or contact me using any of the methods listed in the Contact Me tab at the top of the page. 

You can shop with me from anywhere in New Zealand by clicking here

Wednesday, 10 April 2024

Around the World on Wednesday This or That


Welcome to a new hop with the crew at Around the World on Wednesday. On the second Wednesday of each month, the team put together a thematic hop to give you some inspiration for your own crafting. We love it when you try out something new or CAS(E) one of our projects. The team is truly international, with members from each time zone of the world that Stampin' Up! operates. You're with me, in New Zealand - the first place in the Stampin' Up! world to change the date. 😀

This month, our challenge is a "This or That". When I'm making things I often have a moment where I can't decide which colour to use, which DSP is best, which sentiment. Sometimes when I'm prepping classes I make two or three variations before deciding which one I'll use. I doubt I'm alone in that process!

This challenge celebrates that process. We were challenged to make two versions of the same card. Turned out that I'd inadvertently done that in last month's hop when I couldn't choose whether to go for a dark or light background. You can see it here.

For this challenge I'm going to show you two versions of a card I made for a recent class. I was playing around with a new fancy fold that I saw while participating in the last Creativity Abounds Virtual Stamp Camp. US Demonstrator Lorraine Tierney presented this during the camp using Notes of Nature. These Stamp Camps are worth it for all the new ideas you'll see and the new people you'll interact with.

I've experimented using the Simply Zinnia bundle from the Online Exclusives. Here are the two versions closed up.


Each card is the same design just with different DSP, sentiments and colours. The vibrant Flowering Zinnias DSP offers many options for different panels, including the panorama background. 


 The sentiments are from the Hooray for Surprises set.


Here they are from behind, showing off the message panel.


So, if you'd come to my class, which one would you have rather made? 
Blackberry Bliss/Melon Mambo 'You're the Best'? 
Or the more subtle Old Olive/Petal Pink 'Make a Wish'?

Next up on the blog with another 'this or that' for you to ponder, is the wonderful Leonie Stuart in Australia.


If you live in New Zealand and don't have a Stampin' Up Demonstrator, I'd love to be yours. I can help you with ideas, get you catalogues and provide you with Stampin' Up products. You can leave a message in the comments or contact me using any of the methods listed in the Contact Me tab at the top of the page. 

You can shop with me from anywhere in New Zealand here.

Here's a list of participants, with links, if you get lost or want to revisit someone.

Jan Clothier - NZ -You are here

Leonie Stuart - AU

Rochelle Laird-Smith - AU

Cheryll Miller - AU

Danielle Kassing - NL

Aurélie Fabre - FR

Angie McKenzie - US

Kelly Taranto - US

Chris Smith - US

Tricia Butts - US

Theresa McEntee - US

Bree Renwick - US

Lori Willcox - CA

Teri West - US

Cheryl Hamilton - US


Thursday, 22 February 2024

Painted Lavender for Creativity Abounds


Welcome to a new hop from the team at Creativity Abounds. If you've not come across us before, we're a team of demonstrators from around the world who craft together to offer you ideas and inspiration. This month, our theme is 'Fun Folds.' In this hop, we'll each present you with a project along with instructions and as you hop around, you'll get ideas for 13 projects. 

In addition, we'll offer you a sneak peek of a second project that is part of the tutorial bundle that we offer as a free gift to customers who make a qualifying purchase. So if you make a purchase of $90 or more with me, I'll send you the PDF of the tutorial bundle to view at your leisure.

I'm busy enjoying the Perennial Lavender suite so I've used that to make a Fold Flat Box Card to share with you. I love the way it folds flat in the envelope then pops out to a free-standing 3D card as a surprise.


As well as the Painted Lavender bundle and Perennial Lavender DSP you will need:

For the base
  • Crumb Cake 27cm x 10.5cm (10 1/2" x 4 1/4"), scored on the long side at 14.5cm, 17.5cm, 22.5cm and 25.5cm. (5 1/2", 6 3/4",8 3/4", 10")
  • DSP 10cm x 10cm (4" x 4") (back)
  • DSP 10cm x 4.5cm  (4" x 1 3/4") (front of the bottom box)
  • Basic White 10cm x 14cm  (4" x 5 1/4")(to put on the back to write on)
For the front pop-up
  • Crumb Cake 7.5cm x 15cm (3" x 6"), scored on the long side at 10cm and 13 cm (4" and 5 1/4")
  • DSP 7cm x 9.5cm (2 3/4" x 3 3/4")
  • DSP 7cm x 2.5cm (2 3/4" x 1")
  • Basic White 7cm x 2cm for the sentiment (2 3/4" x 3/4")
  • Fluid 100 Watercolour Paper approx. 11cm x 11cm (4 1/4" x4 1/4")
Other
  • Gorgeous Grape, Lost Lagoon and Fresh Freesia inkpads
  • Water Painters
  • Something Fancy bundle for the sentiment (or other of your choice)
  • Purple Shimmer Gems

NB: How you glue the pieces together affects how well it stands and fits in the envelope, so please follow instructions 3 and 5 carefully. When gluing, always have the card folded as if it would be going into the envelope, i.e.nothing hanging over any edge of the 10.5cm x 14.5cm section.

  1. Attach the 10cm x 10cm DSP to the top of the largest section of the base piece. It will not cover the whole area - the bottom 4.5 cm is plain.)
  2. Fold the base piece in half at the score line, so that the DSP is facing up. Attach the 10cm x 4.5cm DSP to the second section up from the fold (i.e. the one that is 10.5cm x 5cm).
  3. Put adhesive on the narrow topsection. Fold under the top two sections and press so the flap adheres to the base. When unfolded, the base should now be freestanding. Set aside.
  4. Take the narrower pop out piece and attach the DSP pieces to the corresponding sections.
  5. Attaching the two pieces
    • Take the base piece and fold it flat to a 10.5cm x 14.5cm size as if it was going into the envelope.
    • Take the pop out piece. Fold the top two sections over so that all you can see is the larger Dsp panel.
    • Turn this piece over and apply adhesive to the narrow flap.
    • Turn it back over so the DSP is facing you. Place it so that the top fold is centred and lines up with the top of the base. When you are sure it is centred and straight, press the flap section to adhere it to the base.
    • The bottom of the pop-out should be overlapping the front of the box mechanism of the base piece. Lift the flapping piece and put adhesive on the bottom 1cm. Making sure the box mechanism is flat, press the two pieces together so they adhere.
    • The card should be as it would be in an envelope and can now be opened out to stand freely.
  6. Decoration
    • Die cut from the Fluid 100 Water Color paper two of the foliage dies and 2 of the die that cuts two lavender stems.
    • Use the water painters to paint the foliage in Lost Lagoon. Then use Fresh Freesia, with touches of Gorgeous Grape, to colour the lavender. You can use touches of Lost Lagoon to colour the stems.
    • Arrange the lavender as desired on the front pop-up panel. You may need to trim the length.
    • Stamp your desired sentiment in Gorgeous Grape, then die cut. I have used the Something Fancy bundle but you could use whatever you like.
    • Attach the sentiment with dimensionals. Finish off with three Purple Fine Shimmer Gems.
  7. The large white panel can be decorated as desired and attached to the back of the box card for messages. 

If you would rather watch the assembly of the card, I have a video tutorial for a card of the same style but using different materials that you can watch here.

Here's a sneak peek at my other fancy fold card that is included in the Creativity Abounds Fancy Folds tutorial, which will be free with a qualifying purchase of $90 or more. 


If you like to receive the tutorial package but don't live in New Zealand, you can visit the demonstrators in the team from your area. Here we all are:


If you live in New Zealand and don't have a Stampin' Up Demonstrator, I'd love to be yours. I can help you with ideas, get you catalogues and provide you with Stampin' Up products. You can leave a message in the comments or contact me using any of the methods listed in the Contact Me tab at the top of the page. 

You can shop with me from anywhere in New Zealand by clicking here

Here's the blog roll so you can get even more ideas to fuel your creativity.